 Honda Accord: Brake/Clutch Fluid

Use the same fluid for both the brakes and clutch.
• Checking the Brake Fluid
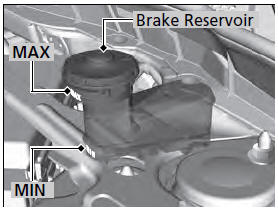
The fluid level should be between the MIN and MAX marks on the side of the reservoir.
NOTICE
Brake fluid marked DOT 5 is not compatible with your vehicle's braking system and can cause extensive damage.
If the specified brake fluid is not available, you should use only DOT 3 or DOT 4 fluid from a sealed container as a temporary replacement.
Using any non-Honda brake fluid can cause corrosion and decrease the longevity of the system. Have the brake system flushed and refilled with Honda Heavy Duty Brake Fluid DOT 3 as soon as possible.
If the brake fluid level is at or below the MIN mark, have a dealer inspect for leaks or worn brake pads as soon as possible.

• Checking the Clutch Fluid

The fluid level should be between the MIN and MAX marks on the side of the reservoir.
If the clutch fluid level is at or below the MIN mark, have a dealer inspect for leaks or an excessively worn clutch plate as soon as possible.
 Transmission Fluid
• Continuously Variable Transmission (CVT) Fluid
Have a dealer check the fluid level and replace if necessary.
NOTICE
Do not mix HCF-2 with other transmission fluids.
Using a transmission ...
 Refilling Window Washer Fluid
Check the amount of window washer fluid by looking at the reservoir.
If the level is low, fill the washer reservoir.
If the washer fluid is low, the washer level
indicator comes on.
Pour the ...
See also:
Playing an iPod (Models with navigation system)
Playing an iPod (Models with navigation system) ...
Recommended Tire Pressures
Normal Driving
The following charts show the
recommended cold tire pressures for
most normal driving conditions.
4-cylinder models
V6 models
The compact spare tire pressure is:
60 psi (42 ...
Pump Replacement
1. Place a suitable container under the vehicle to catch
any spilled fluid.
2. Drain the power steering fluid from the reservoir (see
page 17-28).
3. Remove the drive belt (A) from the pump pu ...