 Honda Accord: APP Sensor Signal I n s p e c t i o n
NOTE: - This procedure checks the APP sensor in its fully closed position. In any other position, the APP sensor stores DTCs which are covered in other troubleshooting procedures.
- Check for Pending or Confirmed DTCs with the HDS before doing this procedure. If any DTCs are indicated, troubleshoot them first, then do this procedure.
- Press the accelerator pedal several times, to check its operation. If it does not operate smoothly, check the pedal. If you find a problem, replace the accelerator pedal module (see page 11-240).
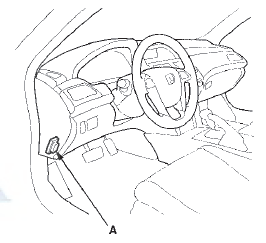
1. Connect the HDS to the data link connector (DLC) (A) located under the driver's side of the dashboard.
2. Turn the ignition switch to ON (II).
3. Make sure the HDS communicates with the ECM/PCM. If it doesn't, go to the DLC circuit troubleshooting (see page 11-181).
4. Make sure the accelerator pedal is not pressed, then check the APP SENSOR in the DATA LIST with the HDS.
- If it is 0 %, the APP sensor is OK.
- If it is not 0 %, update the ECM/PCM if it does not have the latest software (see page 11-203), or substitute a known-good ECM/PCM (see page 11-7), then go to step 5.
5. Make sure the accelerator pedal is not pressed, then check the APP SENSOR in the DATA LIST with the HDS.
- If it is 0 %, the APP sensor is OK.
- If it is not 0 %, replace the accelerator pedal module (see page 11 -240), then go to step 1.
 DTC Troubleshooting
DTC P0122: TP Sensor A Circuit Low Voltage
NOTE: Before you troubleshoot, record all freeze data
and any on-board snapshot, and review the general
troubleshooting information (see page 11-3).
1. ...
 Accelerator Pedal Module
Removal/Installation
Accelerator Pedal Module
Removal/Installation
1. Disconnect the APP sensor connector (A).
2. Remove the accelerator pedal module (B).
NOTE: The APP sensor is not available separately. Do
not disassemble the accelerator pedal module.
3. ...
See also:
A/C Condenser Replacemen
1. Recover the refrigerant with a recovery/recycling
charging station (see page 21-80).
2. Remove the front grille cover (see page 20-274).
3. Remove the intake air duct and the water separator ...
Using the Trunk Release Button*
Push up the release button on the trunk lid
after the doors are unlocked.
Even if the trunk is locked, you can open the
trunk if you carry the smart entry remote.
uThe beeper will sound.
• ...
Differential Carrier and Final Driven
Gear Replacement
1. Remove the final driven gear (A) from the differential
carrier (B).
NOTE: Differential carrier bolts have left-hand
threads.
2. Install the final driven gear in the direction shown on
the ...