 Honda Accord: Fuel Fill Pipe Removal/Installation
1. Drain the fuel tank (see page 11-309).
2. Remove the fuel fill cap.
3. Remove the left rear wheel.
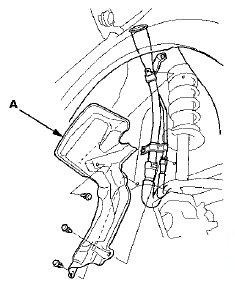
4. Remove the fuel fill pipe cover (A).
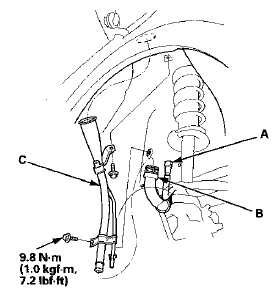
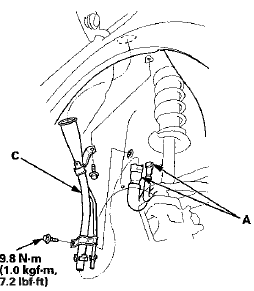
5. Disconnect the quick-connect fittings (A) (see-page .1.1-314) (and on all models except PZEV, disconnect the fuel fill tube (B) from the fuel fill pipe. Slide back the clamp, then twist the hose as you pull to avoid damaging them).
All models except PZEV
PZEV model
S. Remove the fuel fill pipe (C).
7. Install the parts in the reverse order of removal.
NOTE; Before connecting the fuel fill pipe and quick-connect fitting, check for dirt, and clean it if needed, taking care not to damage the fuel fill pipe and other parts.
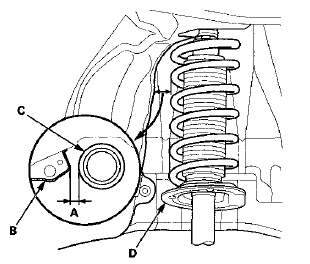
8. After installing the parts, measure the clearance (A) between the fuel filler pipe cover (B) and the left rear damper spring outline (C) at a point 5.9 in (150 mm) to 8.2 in (210 mm) from the left rear damper spring base (D). Make sure the clearance (A) is more than 0.81 in (20.7 mm).
NOTE: To measure the clearance, raise the vehicle on the lift.
 Fuel Tank Replacement
1. Drain the fuel tank (see page 11 -309).
2. Reinstall the fuel tank unit without connecting the fuel
tank unit 4P connector and the quick-connect fitting
(see page 11-321).
3. Remove the fue ...
 Fuel Gauge Sending Unit Test
NOTE: For the fuel gauge system circuit diagram, refer
to the Gauges Circuit Diagram (see page 22-336).
1. Check the No. 5 METER (7.5 A) fuse in the driver's
under-dash fuse/relay box before test ...
See also:
Bearing Removal
Special Tools Required
•Attachment, 78x80 mm 07NAD-PX40100
-Driver Handle, 15 x 135L 07749-0010000
-Bearing Driver Attachment, 42 x 47 07746-0010300
1. Remove the idler gear shaft (see page 1 ...
Rack Guide Adjustment
Special Tools Required
Locknut Wrench, 40 mm 07MAA-SL00100 or Locknut
Wrench, 41 mm 07916-SA50001
1. Set the front wheels in the straight ahead position.
2. Loosen the rack guide screw locknut ( ...
Display Setup
You can change the brightness or color theme of the audio/information screen.
• Changing the Screen Brightness
1. Press the SETTINGS button.
2. Rotate to select System
Settings, then
pres ...