 Honda Accord: Fuel Gauge Sending Unit Test
NOTE: For the fuel gauge system circuit diagram, refer to the Gauges Circuit Diagram (see page 22-336).
1. Check the No. 5 METER (7.5 A) fuse in the driver's under-dash fuse/relay box before testing.
2. Check for body electrical system DTCs.
- If no problem is found, go to step 3.
- If DTC B1175 or B1176 is indicated, go to the indicated DTCs troubleshooting.
3. Turn the ignition switch to LOCK (0).
4. Remove the rear seat cushion (see page 20-241).
5. Remove the access panel (A) from the floor.

6. Disconnect the fuel tank unit 4P connector (B).
7. Measure the voltage between fuel tank unit 4P connector terminals No. 1 and No. 3 with the ignition switch turned to ON (II). There should be battery voltage.
- If the voltage is OK, go to step 8.
- If the voltage is not as specified, check for: - a short in the PUR wire to ground.
- an open in the PUR or ORN wire.
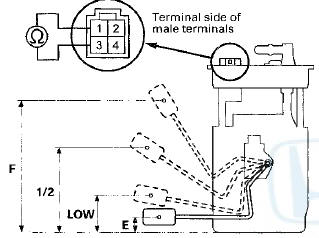
FUEL TANK UNIT 4P CONNECTOR
Wire side of female terminals
8. Turn the ignition switch to LOCK (0).
9. Remove the fuel tank unit from the fuel tank (see page 11-320).
10. Measure the resistance between fuel tank unit 4P connector terminals No. 1 and No. 3 with the float at E (EMPTY), LOW (LOW FUEL INDICATOR), 1/2 (HALF FULL), and F (FULL) positions.
If you do not get the following readings, replace the fuel gauge sending unit (see page 11-324).
11 Reconnect the fuel tank unit 4P connector.
12 Remove the No. 15 BACK UP (10 A) fuse from the under-hood fuse/relay box for at least 10 seconds, then reinstall it.
13. Turn the ignition switch to ON (II).
14. Check that the pointer of the fuel gauge indicates F with the float at F.
- If the pointer of the fuel gauge does not indicate F, replace the gauge control module.
- If the gauge is OK, the test is complete.
NOTE: - The pointer of the fuel gauge returns to the bottom of the gauge dial when the ignition switch is turned to ACC (I) or LOCK (0), regardless of the fuel level.
- Remove the No. 15 BACK UP (10 A) fuse from the under-hood fuse/relay box for at least 10 seconds after completing troubleshooting, otherwise it may take up to 20 minutes for the fuel gauge to indicate the correct fuel level.
 Fuel Fill Pipe Removal/Installation
1. Drain the fuel tank (see page 11-309).
2. Remove the fuel fill cap.
3. Remove the left rear wheel.
4. Remove the fuel fill pipe cover (A).
5. Disconnect the quick-connect fittings (A) ( ...
 Low Fuel Indicator Test
1. Do the gauge self-diagnostic test (see page 22-332).
- If the low fuel indicator flashes, go to step 2.
- If the low fuel indicator does not flash, replace the
gauge control module (see page ...
See also:
Adjusting the Sound
BASS, TREBLE, FADER, and
BALANCE are each adjustable. You
can also adjust the strength of the
sound coming from the subwoofer
speaker. In addition, you can set the
speed-sensitive volume
c ...
Symptom Troubleshooting
Poor ASH or FM radio reception or interference
NOTE:
• Check the vehicle battery condition first (see page
22-90).
• Check the connectors for poor connections or loose
terminals.
Đ ...
Types of Airbags
Your vehicle is equipped with three types of airbags:
• Front airbags: Airbags in front of the driver's and front
passenger's seats.
• Side airbags: Airbags in the driver's and front passenge ...