 Honda Accord: Front Impact Sensor Replacement
Removal
1. Do t h e battery t e r m i n a l d i s c o n n e c t i o n procedure (see page 22-91), t h e n w a i t at least 3 m i n u t e s before s t a r t i ng work.
2. Remove t h e f r o n t b u m p e r (see page 20-255).
3. Left side: remove t h e intake air resonator (see page 11-333).
4. Disconnect t h e left or r i g h t engine c o m p a r t m e n t w i re harness 2P connector (A) f r o m t h e f r o n t impact sensor (B).
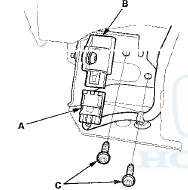
5. Remove t h e TORX bolt (C) u s i n g a TORX T30 bit, t h en remove t h e f r o n t impact sensor.
Installation
1. Install t h e f r o n t impact sensor (A) w i t h n e w TORX bolts (B), u s i n g a TORX T30 bit. Connect t h e left or right engine c o m p a r t m e n t w i r e harness 2P connector (C) t o t h e f r o n t impact sensor.

2. Do t h e battery t e r m i n a l reconnection procedure (see page 22-91).
3. Clear any DTCs w i t h t h e HDS (see page 24-38).
4. C o n f i rm proper SRS o p e r a t i o n : T u r n t h e i g n i t i on switch t o ON (II); t h e SRS indicator s h o u l d c o m e on f o r about 6 seconds and t h e n g o off.
5. Reinstall all r e m o v e d parts.
 ODS Unit Replacement
Removal
1. Do t h e battery t e r m i n a l disconnection procedure (see
page 22-91), t h e n w a i t at least 3 minutes before
s t a r t i ng work.
2. Remove t h e f r o n t passenger's seat (s ...
 Driver's Seat Position Sensor Replacement
Removal (Power seat)
NOTE: Do not t u r n t h e i g n i t i o n s w i t c h t o ON (II), a n d do
not connect t h e battery cable w h i l e r e m o v i n g t he
d r i v e r ' s seat p o s i t i o n ...
See also:
Using the Trunk Opener
Pulling the trunk release to the lower left of
the driver's seat unlocks and opens the trunk.
• Locking the trunk opener
You can lock the trunk release with the master
key* or the built-in ...
Disc Changer Error Messages (Models with navigation system)
The chart on the right explains the
error messages you may see in the
center display while playing a disc.
If you see an error message in the
center display while playing a disc,
press the ej ...
Modifying Your Vehicle
Removing parts from your vehicle,
or replacing components with
non-Honda components could
seriously affect your vehicle’s
handling, stability, and reliability.
Some examples are:
Lowering ...