 Honda Accord: Trunk Lid Latch Replacement
Special Tools Required
KTC Trim Too! Set SOJATP2014*
*Available through the Honda Tool and Equipment Program; call 888-424-6857
NOTE: - Put on gloves to protect your hands.
- Take care not to scratch the trunk lid.
- Use the appropriate tool from the KTC trim tool set to avoid damage when removing components.
- Take care not to kink the trunk lid opener cable.
1. Insert a trim tool through the latch cover (A) opening, and pry on the cover to release the hooks (B). Pull out the cover, and release the tab (C) from the trunk lid latch (D), then remove the latch cover.
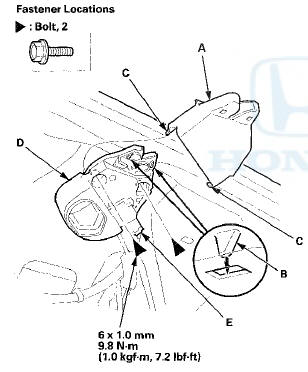
2. Disconnect the trunk lid latch connector (E), and remove the bolts, then remove the trunk lid latch.
3. Disconnect the trunk lid opener cable (A).
4. Install the latch in the reverse order of removal, and note these items: - Make sure the connector is plugged in properly and the opener cable is connected properly.
- Make sure the trunk lid opens properly and locks securely.
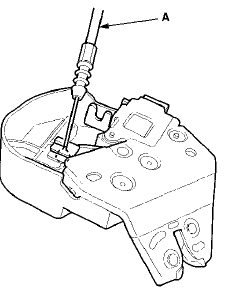
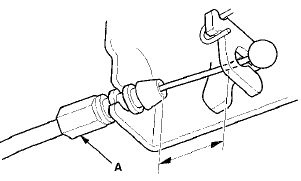
- Fix the original position of the outer end of cable (A) on the trunk lid latch securely. And check the trunk lid latch operation: Make sure the trunk lid latch unlock when pulling the trunk lid opener/fuel fill door opener. If necessary, adjust the position of the cable end.
 Trunk Lid Opener/Fuel Fill Door Opener
Replacement
Trunk Lid Opener/Fuel Fill Door Opener
Replacement
Special Toots Required
KTC Trim Tool Set SOJATP2014*
*Available through the Honda Tool and
Equipment
Program; call 888-424-6857
NOTE:
- Put on gloves to protect your hands.
- Take care not t ...
 Frame
Frame
...
See also:
Winter Driving
Tires marked ‘‘M + S’’ or ‘‘All
Season’’ on the sidewall have an allweather
tread design suitable for
most winter driving conditions.
For the best performance in snowy
or icy ...
Transmission Number
Transmission Type
88E5: 5-speed Manual
M91 A: 5-speed Automatic
B90A: 5-speed Automatic
Serial Number
3000001-”. M91A, B90A
8400001-: 88E5 ...