 Honda Accord: Compass Calibration
If the compass indicates the wrong direction, or the CAL indicator blinks, you need to manually calibrate the system.
Compass operation can be affected under the following conditions:
• Driving near power lines or stations
• Crossing a bridge
• Passing a large vehicle, or driving near a large
object that can cause a magnetic disturbance
• When accessories such as antennas and roof racks
are mounted by magnets
1. Set the power mode to ON.
2. On the top screen of any audio source,
press and hold  for 5 seconds.
- The display switches to the Compass
Settings screen.
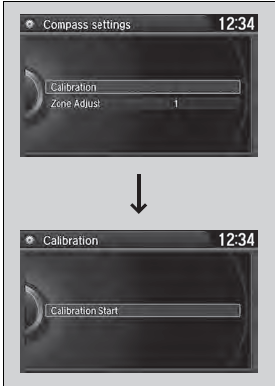
3. Rotate  to select Calibration,
then press .
to select Calibration,
then press .
4. When the display changes to Calibration
Start, press .
5. Drive the vehicle slowly in two circles.
- The compass starts to show a direction
after the calibration. The CAL indicator
goes off.
Calibrate the compass in an open area.
While setting the compass, press the BACK button to cancel the setting mode and return to the previous screen.
 Compass*
When you set the power mode to ON, the compass self-calibrates, and the
compass
display appears. ...
 Compass Zone Selection
1. Set the power mode to ON.
2. On the top screen of any audio source,
press and hold for 5
seconds.
- The display switches to the Compass
Settings screen.
3. Rotate to sele ...
See also:
Safety Labels
Label Locations
These labels are in the locations shown. They warn you of potential hazards
that can cause serious injury or death. Read these labels
carefully.
If a label comes off or becomes h ...
Side Turn Signal/Emergency Indicator Light Bulbs*
Door mirrors have the side turn lights. Have an authorized Honda dealer
inspect and
replace the light bulbs.
...
Multi-View Rear Camera
About Your Multi-View Rear Camera
The audio/information screen can display your vehicle’s rear view. The
display
automatically changes to the rear view when the shift lever is moved to (R.
T ...