 Honda Accord: Wiper Arm/Nozzle Adjustment
4-door
1. Turn the wiper switch ON, and then back OFF.
2. W h e n t h e w i p e r a r m s s t o p at t h e p a r k p o s i t i o n , c o n f i rm that t h e y a r e at t h e s t a n d a r d position.
a: Position at about 1.4 in (35.5 mm) from the top of cowl cover (A), b: Position at about 1.4 in (35.5 mm) from the top of cowl cover (A).
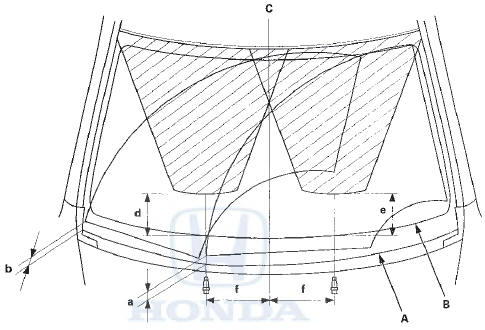
3. When you turn on the washer(s), confirm 50 % or more of the washer fluid lands within the spray area. If the spray area is not within the standard positions, adjust the nozzle(s).
d: Position at about 6.6 in (167.6 mm) from the top of the black ceramic area (B) at the lower windshield, e: Position at about 6.6 in (167.6 mm) from the top of the black ceramic area (B) at the lower windshield, f: Position at about 9.8 in (250 mm) from the windshield center line (C).
2-door
1. Turn the wiper switch ON, and then back OFF.
2. When the wiper arms stop at the park position, confirm that they are at the standard position.
a: Position at about 1.3 in (32.2 mm) from the top of cowl cover (A), b: Position at about 1.4 in (34.5 mm) from the top of cowl cover (A).
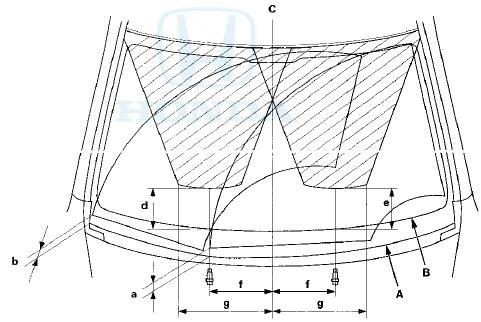
3. When you turn on the washer(s), confirm 50 % or more of the washer fluid lands within the spray area. If the spray area is not within the standard positions, adjust the nozzle(s).
d: Position at about 5.9 in (149 mm) from the top of the black ceramic area (B) at the lower windshield, e: Position at about 5.9 in (149 mm) from the top of the black ceramic area (B) at the lower windshield, f: Position at about 9.8 in (250 mm) from the windshield center line (C).
g: Position at about 14.6 in (370 mm) from the windshield center line (C).
 Wiper Blade Replacement
Removal
1. Lift the wiper arms off the windshield.
2. Pull up and hold the tab (A), and slide the wiper blade
assembly (B) toward the tabs until it releases from the
wiper arm (C).
NOTE: The ...
 Washer Tube Replacemen
1. Remove the right front inner fender (see page 20-290).
2. Remove the windshield washer nozzles and clips, then remove the tubes.
*1:USA models
*2: Canada models
3. Install in the reverse or ...
See also:
Fuse Locations
If any electrical devices are not working,
turn the ignition switch to LOCK
and
check to see if any applicable fuse is blown.
• Engine Compartment Fuse Box
Located near the brake fluid rese ...
Removing Discs from the Changer
To remove the disc that is currently
playing, press the eject button. You
will see ‘‘EJECT’’ in the center
display. When you remove the disc
from the slot, the system
automatically e ...
Countershaft Bearing Replacement
Special Tools Required
- Oil Seal Driver, 65 07JAD-PL90100
- Adjustable Bearing Puller, 20-”40 mm 07736-A01000B
- Slide Hammer 3/8"-16 UNF, commercially available
1. Remove the bearing ...