 Honda Accord: VTC Oil Control Solenoid Valve
Removal/Test/lnstallation
Honda Accord: VTC Oil Control Solenoid Valve
Removal/Test/lnstallation
1 Disconnect the VTC oil control solenoid valve 2P connector (A).
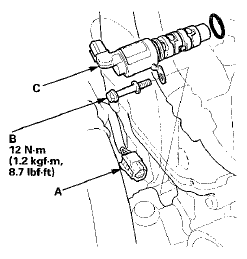
2. Remove the bolt (B) and the VTC oil control solenoid valve (C).
3. Connect VTC oil control valve 2P connector terminal No. 2 to the battery positive terminal with a jumper wire. Connect VTC oil control solenoid valve 2P connector terminal No. 1 to the battery negative terminal with a jumper wire.
VTC OIL CONTROL SOLENOID VALVE 2P CONNECTOR
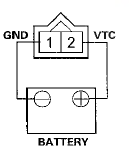
Terminal side of male terminals
4. Measure the clearance of the valve (A). The clearance should be at least 0.05 in (1.2 mm) - If the clearance is as specified, the valve is OK; reinstall it with a new O-eing.
- If the clearance is not as specified, install a new valve and O-ring.
NOTE - Before you install the valve, make sure its mating surface to the cylinder head is clean and dry.
- Coat the O-ring with engine oil before you install it.
- Do not install the valve while wearing cloth fibrous gloves. Be careful not to contaminate the cylinder head opening.

 DTC Troubleshooting
DTC P0010: VTC Oil Control Solenoid Valve
Malfunction
NOTE: Before you troubleshoot record all freeze data
and any on-board snapshot and review the general
troubleshooting Information (see page 11 ...
 CMP Sensor A Replacement
1. Disconnect the CMP sensor A 3P connector (B).
2. Remove CMP sensor A from the intake camshaft side
of the cylinder head.
3. Install the parts in the reverse order of removal with a
new O-ri ...
See also:
Center Console Armrest Replacement
Special Tools Required
KTC Trim Tool Set SOJATP2014*
* Available through the Honda Tool and
Equipment
Program; call 888-424-6857
NOTE:
- Take care not to scratch the console.
- Use the appro ...
Rear Seat-back Latch Replacement
NOTE:
- Take care not to bend or scratch the interior trim.
- 4-door is shown; 2-door is similar.
1. Remove the rear shelf (see page 20-128).
2. Disconnect the seat-back release cable (A) fr ...
Training HomeLink
Before you begin - If you just
received your vehicle and have not
trained any of the buttons in
HomeLink before, you should erase
any previously learned codes before
training the first butto ...