 Honda Accord: VTC Actuator Inspection
1. Remove the cam chain (see page 6-62).
2. Loosen the rocker arm adjusting screws (see step 2 on page 6-81).
3. Remove the camshaft holder (see step 3 on page 6-81).
4. Remove the intake camshaft.
5. Check that the variable valve timing control (VTC) actuator is locked by turning the VTC actuator counterclockwise. If it is not locked, turn the VTC actuator clockwise until it stops, then recheck it. If it is still not locked, replace the VTC actuator.
6. Seal the retard holes (A) in the No. 1 camshaft journal with tape and a wire tie.
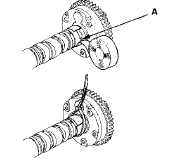
7. Seal one of the advance holes (A) with tape.
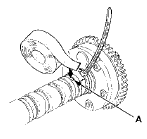
8. Apply air to the unsealed advance hole to release the lock.

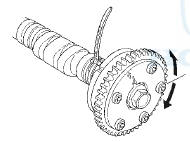
9. Check that the VTC actuator moves smoothly. If the VTC actuator does not move smoothly, replace the VTC actuator.
10. Remove the wire tie, the tape, and the adhesive residue from the No. 1 camshaft journal.
11. Make sure the punch marks on the VTC actuator and the exhaust camshaft sprocket are facing up, then set the camshafts in the cylinder head (see step 7 on page 6-93).
12. Set the camshaft holders and cam chain guide B in place (see step 8 on page 6-93).
13. Tighten the camshaft holder bolts to the specified torque (see step 9 on page 6-93).
14. Hold the camshaft, and turn the VTC actuator clockwise until you hear it click. Make sure to lock the VTC actuator by turning it.
15. Install the cam chain (see page 6-64).
16. Adjust the valve clearance (see page 6-58).
 VTEC Rocker Arm Test
Special Tools Required
. VTEC Air Stopper 07ZAJ-PNAA200
. VTEC Air Adapter 07ZAJ-PNAA101 (2)
. Air Joint Adapter 07ZAJ-PNAA300
- Air Pressure Regulator 07AAJ-PNAA101
1. Start the engine, and let ...
 Valve Clearance Adjustment
Special Tools Required
. Locknut Wrench 07MAA-PR70120
. Adjuster 07MAA-PR70110
NOTE: Connect the Honda Diagnostic System (HDS) to
the data link connector (DLC) and monitor the engine
coolant temp ...
See also:
How to Use This Manual
This manual is divided into multiple sections, The first page of
each section is marked with a black tab that lines up with its
corresponding thumb index tab on this page and the back cover.
You ...
Mainshaft 5th Gear Axial Clearance
Inspection
1. Remove the mainshaft transmission housing bearing
(seepage 14-270).
2. Install the thrust needle bearing ( A ) , 5th gear ( B ) , the
needle bearing (C), the thrust needle bearing (D), the
41 ...
Modifying Your Vehicle
Removing parts from your vehicle,
or replacing components with
non-Honda components could
seriously affect your vehicle’s
handling, stability, and reliability.
Some examples are:
Lowering ...