 Honda Accord: VSA Modulator-Control Unit Removal and
Installation
Honda Accord: VSA Modulator-Control Unit Removal and
Installation
N O T E : - Do not spill brake fluid on the vehicle; it may damage the paint. If brake fluid gets on the paint, wash it off immediately with water.
- Be careful not to damage or deform the brake lines during removal and installation.
- After removal, plug the ends of the hoses and joints to prevent spilling brake fluid.
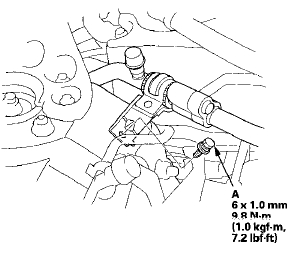
Removal
1. Turn the ignition switch to LOCK (0).
2. Remove the suction line mounting bolt (A) from the bracket.
3. Disconnect the VSA modulator-control unit 36P connector (A) by pushing the lock (B) and pulling down the lever (C); the connector disconnects itself.

4. Disconnect the six brake lines from the VSA modulator-control unit.
NOTE: Brake lines are connected to the master cylinder (D) and to the left-rear (E), the right-front (F), the left-front (G), and the right-rear (H) brake systems.
5. Remove the 6x12 mm flange bolts (I) and 6 x 1 6 mm flange bolt (J), then remove the VSA modulator-control unit (K) with the bracket (L) from the body.
6. Remove the A/C receiver line (M) from the bracket, then remove the clips (N).
7. Remove the VSA modulator-control unit from the bracket.
Installation
1. install the VSA modulator-control unit onto the bracket 2. Install the clips to the bracket, then install the receiver line.
3. Install the bracket with the VSA modulator-control unit to the body.
4. Reconnect the six brake lines, then tighten the flare nuts to the specified torque.
5. Align the connecting surface of the VSA modulator-control unit 36P connector to the VSA modulator-control unit 6. Pull up the lever of the VSA modulator-control unit 36P connector, then confirm the connector is fully seated.
7. Install the suction line mount bolt to the bracket 8. Bleed the brake system (see page 19-9).
9. Do the VSA modulator-control unit update (see page 19-135).
10. Do the VSA sensor neutral position memorization procedure (see page 19-133).
11. Start the engine, and make sure the ABS and the VSA indicators go off.
12. Test-drive the vehicle, and make sure the ABS and the VSA Indicators do not come on.
NOTE: If the brake pedal Is spongy, there may be air trapped in the modulator which could then be induced Into the normal brake system during modulation. Bleed the brake system again (seepage 19-9).
 VSA Modulator-Control Unit Update
Special Tools Required
- Honda diagnostic system (HDS) tablet tester
- Honda interface module (HIM) and an iN workstation
with the latest HDS software version
- HDS pocket tester
- GNA-600 and an ...
 Wheel Speed Sensor Replacement
Front
1. Turn the ignition switch to LOCK (0).
2. Release the clamp (A), then disconnect the wheel speed sensor connector (B).
3. Remove the bolts and the wheel speed sensor (C).
4. Install ...
See also:
Ignition Key Light Test
1. Remove the steering column upper and lower covers
(see page 20-181).
2. Disconnect the 6P connector (A).
3. The LED should come on when power is connected to
terminal No. 6 and ground is co ...
Wear Indicators
The groove where the wear indicator is
located is 1/16 inch (1.6 mm) shallower than
elsewhere on the tire. If the tread has worn so
that the indicator is exposed, replace the tire.
Worn out ...
Audio-HVAC Display Unit
Removal/Installation
Without Navigation
NOTE;
• Put on gloves to protect your hands.
• Take care not to scratch the dashboard.
1. Remove the audio unit (see page 23-114) and the
center display visor (se ...