 Honda Accord: Valve Body Valve Installation
1. Coat all parts with ATF before assembly.
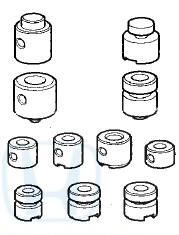
2. Install the valves and the springs in the sequence shown for the main valve body (see page 14-277), the regulator valve body (see page 14-279), and the servo body (see page 14-280). Refer to the following valve cap illustrations, and install each valve cap so the end shown facing up will be facing the outside of the valve body.
3. Install all the springs and the seats. Insert the spring (A) in the valve, then install the valve in the valve body (B) . Push the spring in using a screwdriver, then install the spring seat (C).
 Valve Body Repair
NOTE: This repair is only necessary if one or more of the
valves in a valve body do not slide smoothly in their
bores. Use this procedure to free the valves.
1. Soak a sheet of #600 abrasive pape ...
 Main Valve Body Disassembly,
Inspection, and Reassembly
Main Valve Body Disassembly,
Inspection, and Reassembly
1. Clean all parts thoroughly in solvent, and dry them with compressed air.
Blow out all passages.
2. Do not use a magnet to remove the check balls, it may magnetize the balls.
3. Inspect the ...
See also:
Balancer Shaft Inspection
1. Seat the balancer shaft by pushing it away from the oil
pump sprocket end of the oil pump.
2. Zero the dial indicator against the end of the balancer
shaft, then push the balancer shaft back a ...
Rear Door Outer Molding
Replacement
Special Tools Required
KTC Trim Tool Set SOJATP2014*
- Available through the Honda Tool and Equipment
Program; call 888-424-6857
4-door
N O T E :
- If you remove the door outer molding, replace ...
Brake Booster Replacement
1. Remove the cowl cover (see page 20-278).
2. Remove the strut brace (if equipped) (see page
20-306).
3. Remove the master cylinder (see page 19-26).
4. Disconnect the brake booster vacuum ...