 Honda Accord: Trunk Lid Opener Cable/Fuel Fill Door
Opener Cable Replacement
Honda Accord: Trunk Lid Opener Cable/Fuel Fill Door
Opener Cable Replacement
SRS components are located in this area. Review the SRS component locations, 2-door (see page 24-23), 4-door (see page 24-21) and the precautions and procedures (see page 24-25) before doing repairs or service.
NOTE: - Put on gloves to protect your hands.
- Take care not to scratch the body or the related parts.
-Take care not to kink the trunk lid opener cable/fuel fill door opener cable.
1. Remove these items: - Rear seat cushion (see page 20-241) - Rear seat side bolster, 4-door (see page 20-242) - Front door sill trim, driver's side: - 2-door (see page 20-105) - 4-door (see page 20-107) - Rear door sill trim, both sides, 4-door (see page 20-109) - B-pillar lower trim, 4-door (see page 20-116) - Rear side trim panel, 2-door (see page 20-127) -Trunk side trim panel, left side (see page 20-132) -Rear wheelhouse insulator (see page 20-132) - Fuel cap adapter (see page 20-272) 2. Pull back the carpet as needed.
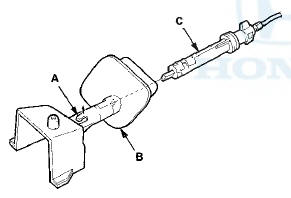
3. Disconnect the trunk lid opener cable/fuel fill door opener cable (A) from the trunk lid opener/fuel fill door opener (B) (see page 20-303).
2-door
4-door
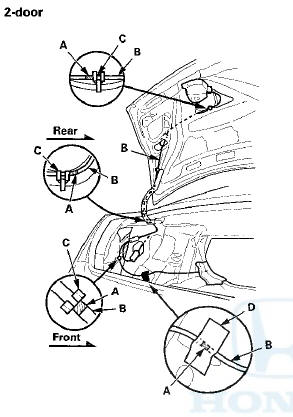
4. Release the opener cable from the clip (C), Remove the cushion tape (D).
5.2-door: Remove the trunk lid opener cable/fuel fill door opener cable (A) from the trunk compartment and the trunk lid.
-1. Detach the opener cable junction box (B) from the body.
-2. Release the trunk lid opener cable/fuel fill door opener cable from the clip (C), and remove the cushion tape (D).
-3. Disconnect the trunk lid opener cable (E) from the trunk lid latch (F) (see page 20-305).
-4. Release the trunk lid opener cable from the clips (G).
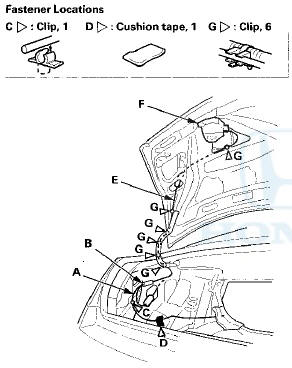
6.4-door: Remove the trunk lid opener cable/fuel fill door opener cable (A) from the trunk compartment and the trunk lid.
-1. Detach the clip (B) and the opener cable junction box (C) from the body, and remove the cushion tape (D).
-2. Disconnect the trunk lid opener cable (E) from the trunk lid latch (F) (see page 20-305).
-3. Release the trunk lid opener cable from the clips (G), and detach the clip (H).
7. While pinching the hooks (A) from inside the vehicle, remove the grommet (B) by releasing the seal (C) from the body.
8. Release the hook (A), then remove the grommet (B) from the fuel fill door latch (C).
9. Remove the fuel fill door opener cable from inside the body.
10. Remove the trunk lid opener cable/fuel fill door opener cable from the vehicle.
11. Install the opener cable in the reverse order of removal, and note these items: - Replace any damaged clips, and replace the cushion tape.
- Align the marks (A) on the opener cable (B) with the cable clips (C) and the cushion tape (D) as shown.
- 4-door: Route the opener cable beside the harness clips (E) correctly.
- 4-door: Apply the cushion tape (F) as shown.
- Before installing the grommet, clean the body bonding surface with isopropyl alcohol.
- Install the grommet by pushing on the hook areas until the hooks snap into place, and push the seal area to make the adhesive stick securely.
2-door

4-door
 Hood Opener Cable Replacement
NOTE:
- Put on gloves to protect your hands.
- Take care not to scratch the body or the related parts.
- Take care not to kink the hood opener cable.
1. Remove these items:
- Front grille c ...
 Hood Latch Replacement
NOTE:
- Put on gloves to protect your hands.
- Take care not to scratch the body or the related parts.
1. Remove the front grille cover:
- 2-door (see page 20-274)
- 4-door (see page 20-274)
...
See also:
Recommended CDs
• Use only high-quality CD-R or CD-RW discs labeled for audio use.
• Use only CD-R or CD-RW discs on which the recordings are closed.
• Play only standard round-shaped CDs.
• CDs with M ...
ECM/PCM Update
Special Tools Required
- Honda diagnostic system (HDS) tablet tester
- Honda Interface Module (HIM) and an iN workstation
with the latest HDS software version
- HDS pocket tester ...