 Honda Accord: Test/Replacement
EX-L, EX-L PZEV models
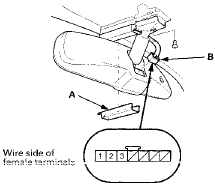
1. Remove the cover (A), then disconnect BP connector (B).

2. Turn the ignition switch to ON (II).
3. Measure the voltage between terminal No. 2 and body ground.
• If there is less than 0.2 V, go to step 4.
• If there is more than 0.2 V, check for: - An open or high resistance in the wire.
- Poor ground (G501).
4. Measure the voltage between terminal No. 1 and body ground.
• if there is battery voltage, go to step 5.
• If there is no voltage, check for: - Blown No. 5 (7.5 A) fuse in the driver's under-dash fuse/relay box.
- An open or high resistance in the wire.
5. Measure the voltage between terminal No. 3 and body ground with the transmission range switch in R position.
• If there is battery voltage, replace the mirror assembly.
• If there is no voltage, check for: - An open or high resistance in the wire.
- Faulty driver's under-dash fuse/relay box.
- Faulty transmission range switch.
 System Description
EX-L, EX-L PZEV models
The automatic dimming Inside mirror has a front-facing
lux level sensor (A), rear-facing lux level sensors (B), and
a control unit. The control unit receives signals from
ea ...
 Power Seats
...
See also:
Rearview Mirror Harness Cover Base
Replacement
4-door with Automatic Dimming Rearview
Mirror
NOTE:
t Put on gloves to protect your hands.
- Wear eye protection while cutting the glass adhesive
with piano wire.
1. Remove these items:
- R ...
Valve Body Repair
NOTE: This repair is only necessary if one or more of the
valves in a valve body do not slide smoothly in their
bores. Use this procedure to free the valves.
1. Soak a sheet of #600 abrasive pape ...
TripMeter
The trip meter shows the number of
miles (U.S.) or kilometers (Canada)
driven since you last reset it.
There are two trip meters: Trip A
and Trip B. Switch between these
displays by pressing ...
