 Honda Accord: System Description
Auto Reverse Power Window Operation
The system is composed of the driver's MICU, passenger's MICU, door multiplex control unit {built into the power window master switch), front passenger's power window control unit (built into the front passenger's power window switch)*, and power window motors.
*: Except LX, LX PZEV, LX-P, LX-P PZEV
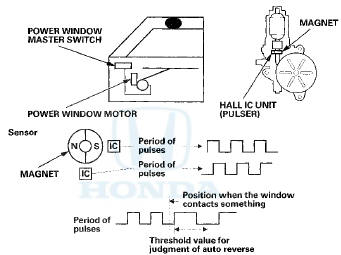
The driver's and front passenger's power window motors incorporate a Hall IC unit (pulser) which generates pulses during the motor's operation and sends pulses to the driver's and passenger's power window control units. As soon as the power window control units detect a change in the pulse frequency from the Hall IC unit (pulser), the power window control units make the power window motor stop and reverse. This prevents pinching your hand or fingers during auto-up operation. The auto reverse function dose not work when the power window master switch is held in the close position.
Key Cylinder Operation
With the key inserted in the driver's door key cylinder, turn the key a second time within 15 seconds and hold it to operate the windows and moonroof (clockwise to open, counterclockwise to close). The windows and moonroof stop moving when the key is released. The auto reverse operation is not active when closing the windows and moonroof with the key cylinder.
Keyless Operation
By pressing and holding the UNLOCK button of the keyless transmitter a second time within 15 seconds, the windows and moonroof open. The windows and moonroof stop moving when the UNLOCK button is released. The windows do not close with the LOCK button.

 Resetting the Power Window Control
Unit
Resetting the Power Window Control
Unit
Resetting t h e power w i n d o w s are r e q u i r e d w h e n any of
t h e f o l l o w i n g have occurred:
• Power window regulator replacement,
r e m o v a l / i n s t a l l a t i o n , or ...
See also:
CMP Pulse Plate B Replacement
1. Remove the cylinder head cover (see page 6-73).
2. Remove camshaft position (CMP) sensor B (see page
11-198).
3. Hold the camshaft with an open-end wrench, then
loosen the bolt.
4. Remov ...
Tire Pressure Sensor Replacement
Removal
Each tire pressure sensor contains a lithium anode
battery that is not removable. The complete tire pressure
sensor should be disposed of according to local battery
disposal guidelines o ...
HFL Menus
The ignition switch must be in ACCESSORY or ON to use HFL.
• Phone Settings screen
To use HFL, you must first pair your Bluetoothcompatible
cell phone to the system while the vehicle
is ...