
 Honda Accord: Symptom Troubleshooting Index
Power Door Locks/Kef less
1. Check for B-CAN DTCs. If any B-CAN DTCs are Indicated, refer to the B-CAN System Diagnosis Test Mode A (see page 22-134) and resolve them first.
2. If the door lock system and the keyless operation do not work, troubleshoot the door locks first.
NOTE: The system does not function when the ignition switch is ON (II).
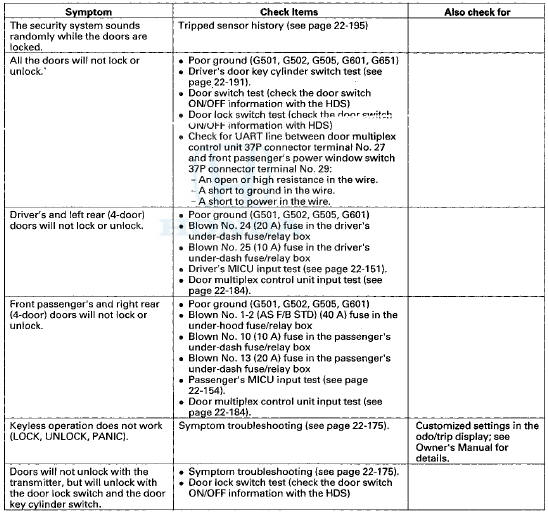
*: If only one door is not working properly, check that door's lock actuator first, then check the other items listed in this table.
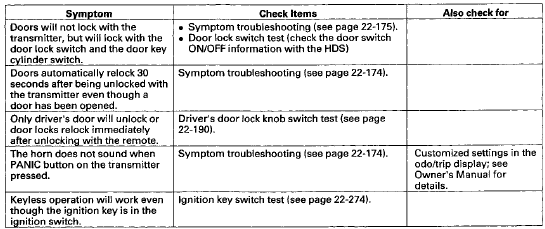
*: If only one door is not working properly, check that door's lock actuator first, then check the other items listed in this table.
 DTC Troubleshooting
DTC B1127: Driver's Door Key Cylinder Switch
Malfunction
NOTE: If you are troubleshooting multiple DTCs, be sure
to follow the instructions in B-CAN System Diagnosis
Test Mode A (see page 22-134). ...
 Symptom Troubleshooting
The horn does not sound and/or the
headlights do not flash when the PANIC
button on the transmitter is pressed
NOTE: Before troubleshooting, check the B-CAN DTCs.
any DTCs are indicated, and trou ...
See also:
Resetting the Power Window Control
Unit
Resetting t h e power w i n d o w s are r e q u i r e d w h e n any of
t h e f o l l o w i n g have occurred:
• Power window regulator replacement,
r e m o v a l / i n s t a l l a t i o n , or ...
Vehicle Identification Number
Manufacturer, Make, and Type of Vehicle
1HG: Honda of America Mfg., Inc.
Honda passenger vehicle
Line, Body, and Engine Type
CS1: Accord Coupe/K24Z3
Body Type and Transmission Type
1: 2-door ...
Oil Jet Replacement
1. Remove the oil pump (see page 8-17).
2. Remove the baffle plate (see step 8 on page 7-14).
3. Remove the oil jet bolts (A), then remove the oil jets
(B).
4. Carefully install the oil jets ...