 Honda Accord: Sunlight Sensor Test
N O T E ; Before testing t h e sensor, check for HVAC DTCs (see page 21-101).
1. Remove the sunlight sensor (see page 21 -186).
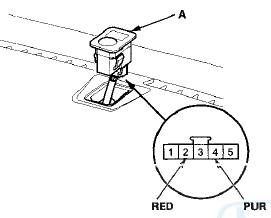
With automatic lighting sensor
Without automatic lighting sensor
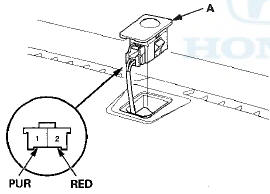
2. Turn the ignition switch to ON (II). Measure the voltage between the terminals with the (+) probe on terminal No. 4 (with automatic lighting sensor) or No. 1 (without automatic lighting sensor) and the ( — ) probe on terminal No. 2 with the connector connected.
NOTE: The voltage readings will not change underthe light of a flashlight or a fluorescent lamp. Voltage should be: • 3.6—3.7 V or more with the sensor out of direct sunlight.
• 3.3—3.5 V or less with the sensor in direct sunlight.
3. If the voltage is not as specified, replace the sunlight sensor (see page 21-186).
 Outside Air Temperature Sensor
Replacement
Outside Air Temperature Sensor
Replacement
1. Lift the tab (A) to release the lock, then remove the
outside air temperature sensor (B) from the front
bumper beam. Disconnect the 2P connector (C) from
the outside air temperature sensor.
2 ...
 Sunlight Sensor Replacement
1. Remove the sunlight sensor (A) from the dashboard,
then disconnect the connector (B). Be careful not to
damage the sensor and the dashboard.
2. Install the sensor in the reverse order of remov ...
See also:
Radio Data System (RDS)
On the FM band, you can select a
favorite station and display the
program service name provided by
the radio data system (RDS).
RDS INFO Display
The RDS information display
function shows th ...
Front Passenger's Weight Sensor Output Check After
a Vehicle Collision
1. Position the front passenger's seat to the rear most
position, and adjust the seat-back to the forward most
position. Do not move the seat from this position.
2. Drive the vehicle, accelerate ...
Stabilizer Bar Replacement
1. Raise and support the vehicle (see page 1-13).
2. Remove the rear wheels.
3. Disconnect both stabilizer links from the stabilizer bar
(see page 18-47).
4. Remove the flange bolts (A) and ...