 Honda Accord: Starter Performance Test
1. Remove the starter (see page 4-11).
2. Firmly clamp the starter in a vise.
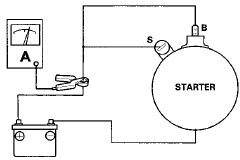
3. Make a connection for this test using the thickest (gauge) wire possible (preferably the same gauge as used on the vehicle).
NOTE: To avoid damaging the starter, never leave the battery connected for more than 5 seconds.
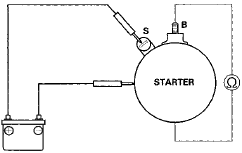
4. Connect the battery as shown, and check for continuity between the B terminal and the starter body. If there is continuity, it is working properly.
5. Disconnect the battery from the body, and check for continuity between the B terminal and the starter body. If there is no continuity, it is working properly.
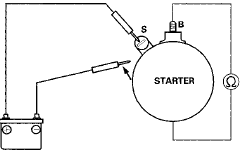
6. Connect the starter to the battery as shown, and confirm that the motor runs.
7. If the electric current meets the specification when the battery voltage is at 11.5 V, the starter is working properly.
Specification
Electric Current: 80 A or less
 Clutch Interlock Switch
Replacement
Clutch Interlock Switch
Replacement
M/T model
1, Disconnect the clutch interlock switch connector (A).
2. Loosen the locknut (B), then remove the clutch
interlock switch (C).
3. Install the clutch interlock switch, and adjust th ...
 Starter Removal and
Installation
Starter Removal and
Installation
Removal
1 Do the battery removal procedure (see page 22-92).
2. Remove the intake manifold (see page 9-4).
3. Disconnect the positive starter cable (A) from the B
terminal, and the S terminal ...
See also:
Disc Scan
When you press the SCAN side of
the SCAN/A. SEL bar repeatedly
until you see D-SCAN in the center
display, or push the interface
selector to the right, the first track of
the current disc pl ...
Modifications
Do not modify your vehicle or use non-Honda components that can affect its
handling, stability, and reliability.
Overall vehicle performance can be affected. Always make sure all equipment
is
p ...
Vents, Heating, and A/C
LX and U.S. EX
Fan Control
Turn this dial to increase or decrease
the fan speed and airflow.
Temperature Control
Turning this dial clockwise increases
the temperature of the airflow.
Air Co ...