 Honda Accord: Stabilizer Link Removal/Installation
1. Raise and support the vehicle (see page 1 -13).
2. Remove the rear wheel.
3. Remove the flange nut (A) and the self-locking nut (B) while holding the respective joint pin (C) with a hex wrench (D), then remove the stabilizer link (E).
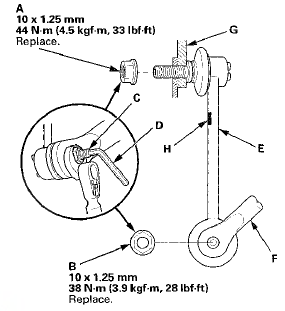
4. Install the stabilizer link on the stabilizer bar (F) and the knuckle adding in the brake hose bracket (G) with the joint pins set at the center of their range of movement.
NOTE: - The stabilizer link has a paint mark (H). The paint mark indicates the difference between the left and right stabilizer links.
- Install the end of the stabilizer link with the paint mark in the upper position.
5. Install the flange nut and the new self-locking nut, and tighten them to the specified torque while holding the respective joint pin with a hex wrench.
6. Clean the mating surfaces of the brake disc and the inside of the wheel, then install the rear wheel.
7. Test-drive the vehicle.
8. After 5 minutes of driving, tighten the self-locking nut again to the specified torque.
 Lower Arm B Replacement
1 Raise and support the vehicle (see page 1-13).
2. Remove the rear wheel.
3. Remove the lower arm B mounting bolts, then
remove lower arm B.
NOTE: Use new mounting bolts during reassembly.
...
 Stabilizer Bar Replacement
1. Raise and support the vehicle (see page 1-13).
2. Remove the rear wheels.
3. Disconnect both stabilizer links from the stabilizer bar
(see page 18-47).
4. Remove the flange bolts (A) and ...
See also:
Safety When Performing Maintenance
Some of the most important safety precautions are given here.
However, we cannot warn you of every conceivable hazard that can arise in
performing maintenance. Only you can decide whether or not ...
Clutch Interlock Switch T e s t
M/T model
1. Disconnect the clutch interlock switch connector (A).
2. Remove the clutch interlock switch (B).
3. Check for continuity between the terminals according
to the table.
- If the ...
Glove Box Lock Cylinder Replacement
NOTE: Take care not to scratch the glove box.
1. Remove the glove box (see page 20-174).
2. While lifting the glove box handle (A), pull out one
end of the retainer (B) with a hook-shaped tool ...