 Honda Accord: Stabilizer Bar Replacement
1. Raise and support the vehicle (see page 1-13).
2. Remove the rear wheels.
3. Disconnect both stabilizer links from the stabilizer bar (see page 18-47).
4. Remove the flange bolts (A) and the bushing holders (B), then remove the bushings (C) and the stabilizer bar (D).
NOTE: During installation, align the paint marks (E) on the stabilizer bar with the side of the bushings.
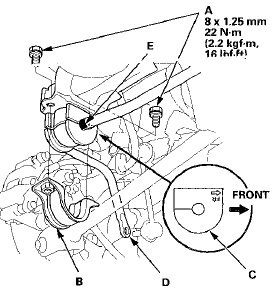
5. Install the stabilizer bar in the reverse order of removal, and note these items: - Note the right and left direction of the stabilizer bar.
- Note the direction of installation for the bushing.
- Refer to the stabilizer link removal/installation to connect the stabilizer bar to the links (see page 18-47).
- Before installing the wheel, clean the mating surfaces of the brake disc and the inside of the wheel.
 Stabilizer Link Removal/Installation
1. Raise and support the vehicle (see page 1 -13).
2. Remove the rear wheel.
3. Remove the flange nut (A) and the self-locking nut (B)
while holding the respective joint pin (C) with a hex
wre ...
 Damper/Spring Removal and Installation
Removal
1. Raise and support the vehicle (see page 1-13).
2. Remove the rear wheel.
3. Fold down the rear seat-back, then remove the lid (A).
NOTE: For 4-door, lift up the tab (B) inside und ...
See also:
Center Console Rear Trim
Removal/Installation
Special Tools Required
KTC Trim Tool Set SOJATP2014*
*Available through the Honda Tool and
Equipment
Program; call 888-424-6857
NOTE:
- Take care not to scratch the center console and the
rela ...
Climate Control Unit
Removal / Installation
With Navigation
1. Remove the passenger's dashboard undercover (see
page 20-170).
2. Disconnect the connectors (A). Loosen the bolt (B)
and remove the bolts (C) from the climate control unit (D) ...
Heater Unit/Core Replacement
SRS components are located in this area. Review the
SRS component locations (see page 24-21) and the
precautions and procedures (see page 24-25) before
doing repairs or service.
1. Do the batter ...