
 Honda Accord: Slave Cylinder Replacement
NOTE: - Use fender covers to avoid damaging painted surfaces.
- Do not spilt brake fluid on the vehicle; it may damage the paint or plastic. If brake fluid does contact the paint or plastic, wash it off immediately with water.
- Make sure not to get any silicone grease on the terminal part of the connectors and switches, especially if you have silicone grease on your hands or gloves.
1. Do the battery removal procedure (see page 22-92).
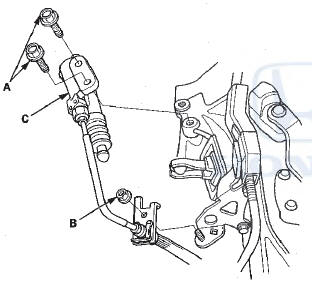
2. Remove the mounting bolts (A), the bracket mounting nut (B), and the slave cylinder (C).
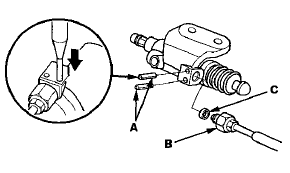
3. Remove the roll pins (A). Disconnect the clutch line (B), and remove the O-ring (C). Plug or wrap the end of the clutch line with a clean shop towel to prevent brake fluid from coming out.
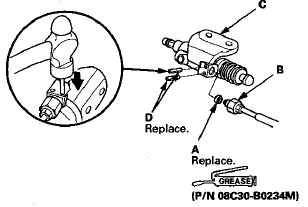
4. Install a new O-ring (A) on the clutch line (B), install the clutch line in the slave cylinder (C), and install new roll pins (D).
5. Pull back the boot (A), and apply silicone grease (P/N 08C30- B0234M) to the boot and the slave cylinder. Reinstall the boot.
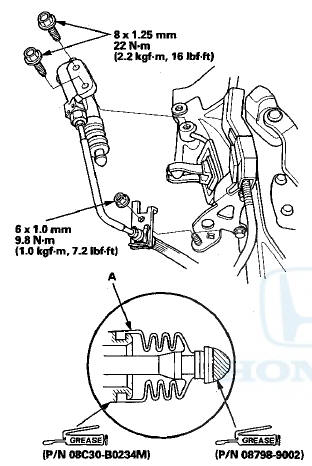
6. Apply a light coat of super high temp urea grease (P/N 08798- 9002) to the end of the slave cylinder pushrod. Install the slave cylinder mounting bolts and the bracket mounting nut.
7. Bleed the clutch hydraulic system (see page 12-6).
8. Check the clutch operation, and check for leaks.
9. Do the battery installation procedure (see page 22-92).
10. Test-drive the vehicle.
 Clutch Master Cylinder Replacement
NOTE:
- Use fender covers to avoid damaging
painted
surfaces.
- Do not spill brake fluid on the vehicle; it may damage
the paint or plastic. If brake fluid does contact the paint
or plastic, ...
 Clutch Hose Replacement
NOTE:
- Replace the clutch hose if it is twisted, cracked, or
leaks.
- Use fender covers to avoid damaging painted
surfaces.
- Do not spill brake fluid on the vehicle; it may damage
the pain ...
See also:
Reporting Safety Defects
In the US
If you believe that your vehicle has a defect which
could cause a crash or could cause injury or death, you
should immediately inform the National Highway
Traffic Safety Administratio ...
Radio Reception
How well the radio receives stations
is dependent on many factors, such
as the distance from the station’s
transmitter, nearby large objects,
and atmospheric conditions.
A radio station’s ...
Wheel and Tire Specifications
Wheels
4-cylinder models:
17 x 7 1/2J
V6 models:
18 x 8J
Tires
4-cylinder models:
P225/50R17 93V
V6 models:
P235/45R18 94V ...