 Honda Accord: Side Impact Sensor (Second) Replacement
4-Door
Removal
1. Do t h e b a t t e r y t e r m i n a l d i s c o n n e c t i o n procedure (see page 22-91), t h e n w a i t at least 3 m i n u t e s before s t a r t i ng work.
2. Remove t h e seat s i de bolster (see page 20-242).
3. Disconnect t h e SRS f l o o r w i r e harness 2P c o n n e c t o r (A) f r om t h e s i de impact sensor (second) (B).
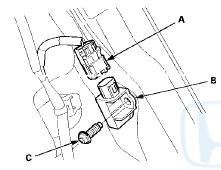
4. Remove t h e TORX bolt (C) u s i n g a TORX T30 b i t , t h en remove t h e s i de i m p a c t sensor (second).
Installation
1. Install t h e s i d e impact sensor (second) (A) w i t h a n e w TORX bolt (B), u s i n g a TORX T30 bit. Connect t h e SRS f l o o r w i r e harness 2P c o n n e c t o r (C) t o t h e s i de impact sensor (second).
2. Do t h e b a t t e r y t e r m i n a l reconnection procedure (see page 22-91).
3. Clear a n y DTCs w i t h t h e HDS (see page 24-38).
4. C o n f i rm proper SRS o p e r a t i o n : T u r n t h e i g n i t i on s w i t c h t o O N (II); t h e SRS indicator s h o u l d come on f o r about 6 seconds and t h e n g o off.
5. Reinstall all r e m o v e d parts.
2-Door
Removal
1. Do t h e battery t e r m i n a l disconnection procedure (see page 22-91), t h e n w a i t at least 3 m i n u t e s before s t a r t i ng work.
2. Remove t h e rear s i d e t r im panel (see page 20-127).
3. Disconnect t h e SRS f l o o r w i r e harness 2P connector (A) from the side impact sensor, (second) (B).

4. Remove t h e TORX b o l t (C) u s i n g a TORX T30 b i t , t h en remove t h e side impact sensor (second).
Installation
1. Install t h e s i de impact sensor (second) (A) w i t h a n ew TORX bolt (B), u s i n g a TORX T30 bit. Connect t h e SRS f l o o r w i r e harness 2P connector (C) t o t h e side impact sensor (second).
2. Do t h e battery t e r m i n a l reconnection procedure (see page 22-91).
3. Clear any DTCs w i t h t h e HDS (see p a g e 24-38).
4. C o n f i rm proper SRS o p e r a t i o n : T u r n t h e i g n i t i on s w i t c h t o O N (II); t h e SRS indicator s h o u l d c o m e on f o r about 6 seconds a n d t h e n g o off.
5. Reinstall all r e m o v e d parts.
 Side Impact Sensor (First) Replacement
4-Door
Removal
1. Do t h e battery t e r m i n a l d i s c o n n e c t i o n procedure (see
page 22-91), t h e n w a i t at least 3 m i n u t e s before
s t a r t i ng work.
2. Remove t h e B-p ...
 Rear Safing Sensor Replacement
Removal
1. Do the battery t e r m i n a l disconnection p r o c e d u r e (see
page 22-91), t h e n wait at least 3 minutes before
starting w o r k .
2. Remove t h e rear seat c u s h i o n (see ...
See also:
Side Sill Protection Tape Replacement
2-door
1. Slowly remove the old side sill protection tape.
2. Clean the body bonding surface with a shop towel
dampened in isopropyl alcohol. After cleaning, keep
oil, grease, and water from get ...
General Information
When using CD-R or CD-RW discs,
use only high quality discs labeled
for audio use.
When recording a CD-R or
CD-RW, the recording must be
closed for it to be used by the disc
changer.
Play ...
A/C Signal Circuit Troubleshooting
1. Start the engine, and let it idle.
2. Turn the blower switch on.
3. Turn the A/C switch on.
4. Check the A/C CLUTCH in the DATA LIST with the
HDS.
Does it indicate ON?
YES-Go to step ...