 Honda Accord: Side Impact Sensor (First) Replacement
4-Door
Removal
1. Do t h e battery t e r m i n a l d i s c o n n e c t i o n procedure (see page 22-91), t h e n w a i t at least 3 m i n u t e s before s t a r t i ng work.
2. Remove t h e B-pillar l o w e r t r im (see page 20-110).
3. Disconnect t h e SRS f l o o r w i r e harness 2P connector (A) from t h e side impact sensor (first) (B).
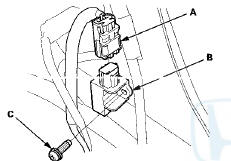
4. Remove t h e TORX bolt (C) u s i n g a TORX T30 b i t , t h en remove t h e side impact sensor (first).
Installation
1. Install t h e s i de impact sensor (first) (A) w i t h a n ew TORX bolt (B), u s i n g a TORX T30 bit. Connect t h e SRS f l o o r w i r e harness 2P connector (C) t o t h e side impact sensor (first).
2. Do t h e battery t e r m i n a l reconnection procedure (see page 22-91).
3. Clear any DTCs w i t h t h e HDS (see page 24-38).
4. C o n f i rm proper SRS o p e r a t i o n : T u r n t h e i g n i t i on s w i t c h t o O N (II); t h e SRS i n d i c a t o r s h o u l d c o m e on f o r about 6 seconds and t h e n g o off.
5. Reinstall all r e m o v e d parts.
2-Door
Removal
1. Do the battery terminal disconnection procedure (see page 22-91), then wait at least 3 minutes before, starting work.
2. Remove the door sill trim (see page 20-105).
• 4-door (see page 20-107) • 2-door (see page 20-105) 3. Turn over the rear portion of the carpet as needed.
4. Disconnect the SRS floor wire harness 4P connector (A), from the side impact sensor (first) (B).

5. Remove the TORX bolt (C) using a TORX T30 bit, then remove the side Impact sensor (first).
Installation
1. Install the side impact sensor (first) (A) with a n ew TORX bolt (B), using a TORX T30 bit. Connect the SRS floor wire harness 4P connector (C) to t h e side impact sensor (first).
2. Do the battery terminal reconnection procedure (see page 22-91).
3. Clear any DTCs with the HDS (see page 24-38).
4. Confirm proper SRS operation: Turn the ignition switch to ON (II); the SRS indicator should come on for about 6 seconds and then go off.
5. Reinstall all removed parts.
 SRS Unit Replacement
Removal
1. Do t h e b a t t e r y t e r m i n a l d i s c o n n e c t i o n procedure
(see
page 22-91), t h e n w a i t at least 3 m i n u t e s before
s t a r t i n g work.
2. Remove t h e d ...
 Side Impact Sensor (Second) Replacement
4-Door
Removal
1. Do t h e b a t t e r y t e r m i n a l d i s c o n n e c t i o n procedure
(see
page 22-91), t h e n w a i t at least 3 m i n u t e s before
s t a r t i ng work.
2. Remove t ...
See also:
Automatic Transmission and A/T Differential
...
Dashboard Center Lower Cover
Removal/Installation
Special Tools Required
KTC Trim Tool Set SOJATP2014*
*Available through the Honda Tool and
Equipment
Program; call 888-424-6857
SRS components are located in this area. Review the
SRS component ...