
 Honda Accord: Side Airbag Replacement
NOTE: If replacing the side airbag after deployment, refer to Component Replacement/Inspection After Deployment (see page 24-208) for a complete list of other parts that must also be replaced.
Removal
1. Do the battery terminal disconnection procedure (see page 22-91), then wait at least 3 minutes before starting work.
2. Remove the front seat (see page 20-194).
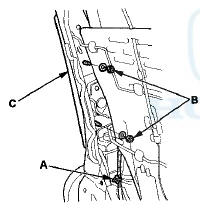
3. Remove the seat-back cover/pad: • 4-door (see page 20-221) • 2-door (see page 20-213) 4. Detach the harness clip (A) from the seat-back frame.
Remove the two mounting nuts (B) and the side airbag (C).
Installation
NOTE: • Ifthe side airbag l id is secured with tape, remove the tape, • Do not open the lid on the side airbag cover.
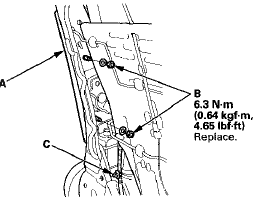
• Use n e w m o u n t i n g nuts t i g h t e n e d t o t h e s p e c i f i ed t o r q u e .
• Make s u r e t h a t t h e seat-back cover is i n s t a l l ed p r o p e r l y . I m p r o p e r i n s t a l l a t i on m a y prevent proper deployment.
• Be s u r e t o i n s t a l l t h e harness w i r e s so t h a t i t is n o t pinched o r i n t e r f e r i n g w i t h other parts.
1. T o r q u e t h e s i d e airbag (A) o n t h e seat-back f r a m e.
Install t h e t w o s i d e a i r b a g n e w m o u n t i n g nuts (B), t h e n install t h e harness c l ip (C).
2. Install t h e seat-back cover/pad in t h e reverse order of removal: • 4-door (see page 20-221) • 2-door (see p a g e 20-213) 3. Install t h e f r o n t seat (see page 20-194).
4. Do t h e b a t t e r y t e r m i n a l reconnection procedure (see page 22-91).
5. M o v e t h e f r o n t seat and t h e seat-back t h r o u g h their f u l l ranges o f m o v e m e n t , m a k i n g sure t h e harness w i r e s are n o t p i n c h e d or i n t e r f e r i n g w i t h other parts.
6. Clear a n y DTCs w i t h t h e HDS (see p a g e 24-38).
7. A f t e r i n s t a l l i ng t h e s i de a i r b a g , c o n f i rm proper s y s t em o p e r a t i o n : T u r n t h e i g n i t i o n s w i t c h t o O N (II); t h e SRS indicator should come on for about 6 seconds a nd t h e n g o off.
 Front Passenger's Airbag Replacement
NOTE: If r e p l a c i n g t h e f r o n t passenger's airbag after
d e p l o y m e n t , refer t o Component Replacement/
Inspection A f t e r Deployment (see page 24-208) f o r a
c o m p l e t e ...
 Side Curtain Airbag Replacement
Removal
NOTE:
• If replacing the side curtain airbag after deployment, refer to Component
Replacement/Inspection After Deployment
(see page 24-208) for a complete list of other parts that mu ...
See also:
Installing a Child Seat with a Tether
A child seat with a tether can be
installed in any seating position in
the back seat, using one of the
anchorage points shown above.
Since a tether can provide additional
security to the la ...
Outboard Joint Side
1. Wrap the splines on the driveshaft with vinyl tape (A)
to prevent damaging the outboard boot.
2. Install new ear clamp bands (B) and the outboard boot
onto the driveshaft, then remove the viny ...
Winter Driving
Tires marked ‘‘M + S’’ or ‘‘All
Season’’ on the sidewall have an allweather
tread design suitable for
most winter driving conditions.
For the best performance in snowy
or icy ...