 Honda Accord: Shift Lock Stop/Shift Lock Stop Cushion
Replacement
Type A Shift Lever
1. Remove the shift lock solenoid (see page 14-254).
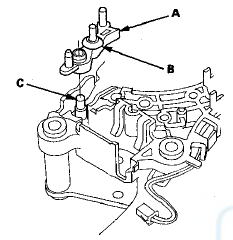
2. Remove the shift lock stop (A) and the stop cushion (B) as a set.

3. Apply silicone grease to the pin (C) of the shift lever bracket, then install the shift lock stop over the pin.
NOTE: Make sure not to get any silicone grease on the terminal part of the connectors and switches, especially if you have silicone grease on your hands or gloves.
4. Install a new shift lock stop.
5. Install the shift lock solenoid (see page 14-253).
Type B Shift Lever
1. Remove the shift lever assembly (see page 14-222).
2. Remove the A/T gear position indicator panel from the shift lever (see page 14-228).
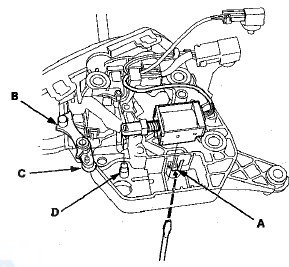
3. Release the lock tab (A) retaining the shift lock solenoid using a thin-bladed screwdriver.

4. Remove the shift lock stop (B) and the stop cushion (C) as a set.
5. Apply silicone grease to the pin (D) of the shift lever bracket, then install the shift lock stop over the pin.
NOTE: Make sure not to get any silicone grease on the terminal part of .the connectors and switches, especially if you have silicone grease on your hands or gloves.
6. Install a new shift lock stop.
7. Install the shift lock solenoid by aligning the joint of the shift lock solenoid plunger with the tip of the shift lock stop, then push the shift lock solenoid into the shift lever securely.
8. Install the A/T gear position indicator panel on the shift lever (see page 14-228).
9. Install the shift lever assembly (see page 14-224).
 Shift Lock Solenoid Replacement
Type A Shift Lever
1. Remove the shift lever assembly (see page 14-222).
2. Release the lock tabs (A) retaining the shift lock
solenoid using thin-bladed screwdrivers.
3. Insert a 6.0 mm (0.24 ...
 Shift Lock Release, Release Spring, and
Release Shaft Replacement
Type A Shift Lever
1. Remove the shift lever assembly (see page 14-222).
2. Remove the A/T gear position indicator panel from
the shift lever (see page 14-227).
3. Release the lock (A) of the ...
See also:
Wiper Blade Replacement
Removal
1. Lift the wiper arms off the windshield.
2. Pull up and hold the tab (A), and slide the wiper blade
assembly (B) toward the tabs until it releases from the
wiper arm (C).
NOTE: The ...
Component Location Index
4-door
2-door
...
HFL Switch Removal/Installation
1. Remove the steering wheel (see page 17-6).
2. Remove the HFL switch (see page 17-7).
3. Install the HFL switch in the reverse order of removal. ...
