 Honda Accord: Shift Lock Release, Release Spring, and
Release Shaft Replacement
Honda Accord: Shift Lock Release, Release Spring, and
Release Shaft Replacement
Type A Shift Lever
1. Remove the shift lever assembly (see page 14-222).
2. Remove the A/T gear position indicator panel from the shift lever (see page 14-227).
3. Release the lock (A) of the shift lock release, and remove the shift lock release and the release spring (B).
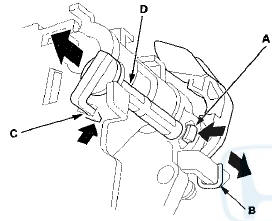
4. Release the lock (C) of the release shaft, and remove the shaft (D).
5. Replace the shift lock release, the release spring, or the release shaft.
6. Install the release spring (A) in the shift lock release (B).
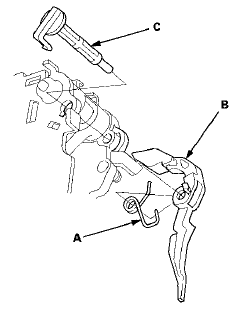
7. Install the release shaft (C) in the shift lever, and install the shift lock release and the release spring on the release shaft end.
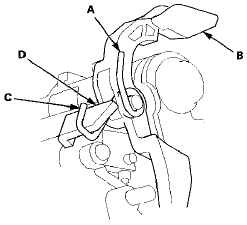
8. Make sure that the release spring end (A) is installed in the shift lock release (B), and the hooked end (C) is on the stop (D).
9. Install the A/T gear position indicator panel on the shift lever (see page 14-227).
10. Install the shift lever assembly (see page 14-224).
 Shift Lock Stop/Shift Lock Stop Cushion
Replacement
Shift Lock Stop/Shift Lock Stop Cushion
Replacement
Type A Shift Lever
1. Remove the shift lock solenoid (see page 14-254).
2. Remove the shift lock stop (A) and the stop cushion
(B) as a set.
3. Apply silicone grease to the pin (C) of the shif ...
 Park Pin Switch Replacement
Type A Shift Lever
NOTE: The AfT gear position indicator panel light
harness and the park pin switch are not available
separately. Replace the A/T gear position indicator panel
light harness and t ...
See also:
Turn Signals
The turn signals can be used when the ignition
switch is in ON .
• One-touch turn signal
When you lightly push up or down and release
the turn signal lever, the exterior turn signals
and t ...
Park Pin Switch Test
Produced in USA models
1. Remove the center console (see page 20-158).
2. Disconnect the A/T gear position indicator panel
light/park pin switch 6P connector (A) from the park
pin switch (B).
...
Carrying Cargo
Your vehicle has several convenient
storage areas:
Glove box
Door and seat-back pockets
Roof-rack (if installed)
Center pockets
Console compartment
Trunk, including the rear seat
when fold ...