 Honda Accord: Shift Lever Housing Replacement
NOTE: - Use the appropriate tool from the KTC trim tool set to avoid damage when removing components.
- Take care not to scratch the center console, dashboard, and related parts.
1. Remove the center console panel (see page 20-157).
2. Remove the harness clamps.
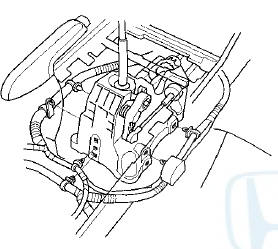
3. Remove the cotter pin (A), the washer (B), and the bolts.
4. Unlock the retainer lock (A).
5. Rotate the socket holder retainer (B) counterclockwise (C) until it stops, and push the retainer lock (D) into the socket holder retainer to lock the retainer.
6. Slide the socket holder (E) and the shift cable (F) out of the shift cable bracket (G). Do not remove the shift cable by pulling the shift cable guide (H).
7. Remove the shift lever assembly (A) from the shift cables (B).
8. Align the socket holder (A) on the shift cables (B) with the slot in the bracket base (C), then slide the holder into the base. Install the shift cable ends (D) to the shift lever assembly (E) then install the shift lever assembly.
NOTE; When installing the shift cable (shift lever side), position the serrated side (F) facing up.
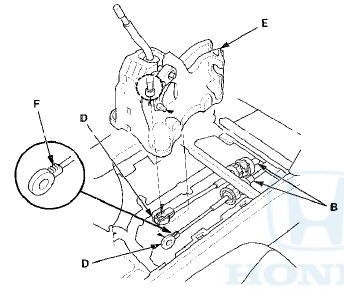
9. Install the bolts, the washer (A), and the cotter pin (B), then bend the cotter pin ends.
NOTE: You can install a new cotter pin from either direction.
10. Install the harness clamps.

11. Install the center console panel (see page 20-157).
 Gearshift Mechanism Replacement
NOTE: Make sure not to get any silicone grease on the terminal part of the
connectors and switches, especially if you
have silicone grease on your hands or gloves.
...
 M/T Differential
...
See also:
Rear Door Latch Replacement
4-door
NOTE: Put on gloves to protect your hands.
1. Remove the door panel and the inner handle (see
page 20-38).
2. Remove the plastic cover as needed (see step 3 on
page 20-42).
3. Detac ...
Taking Care of the Unexpected
This section covers the more
common problems that motorists
experience with their vehicles. It
gives you information about how to
safely evaluate the problem and what
to do to correct it. If ...
Protecting Child Passengers
Each year, many children are injured or killed in vehicle crashes because
they are
either unrestrained or not properly restrained. In fact, vehicle accidents are
the
number one cause of death ...