 Honda Accord: Self-diagnostic Function
The audio system has a self-diagnostic function.
NOTE: • Not all self-diagnostic functions appear on all models.
• There may be other self-diagnostic functions that are for factory use only.
How to Use the Audio System Self-diagnostic Function
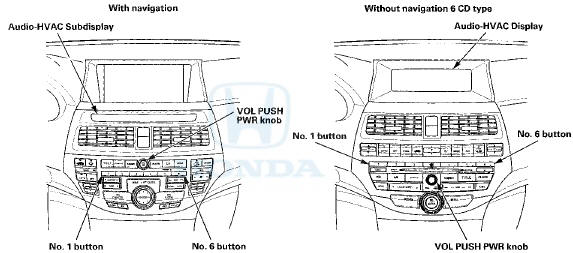
1. Turn the ignition switch to ON (II). Turn the audio unit off.
2. Push and hold the No. 1 and No. 6 buttons. While holding the buttons, push the VOL PUSH PWR knob to on. Release the buttons and the self-diagnostic function begins.
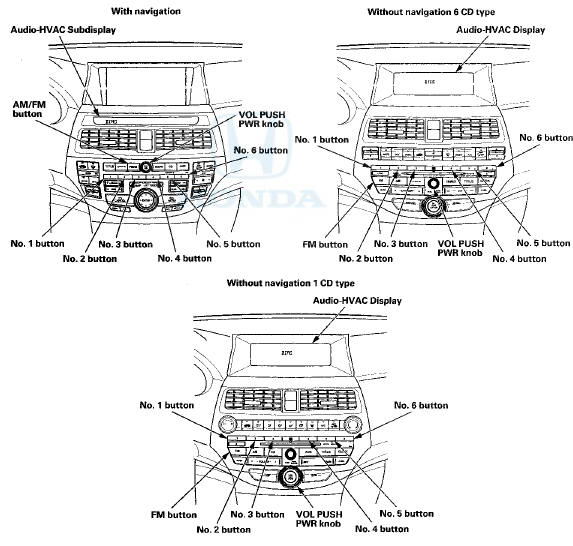
3. By pressing a preset button, the input starts the diagnostic mode that is assigned to that preset switch.
No. 2 button
Audio button, knob, and remote switch detection: Allows individual manual selection of all audio panel knobs, buttons, and remote switches to verify if they are functional. When properly detected, the applied knob button, or remote switch name and/or value is displayed. To exit this mode, go to step 4.
No. 3 button
Entire LCD lighting/light-out mode: Turns on/off the entire LCD to show the presence or absence of an LCD failure.
No. 4 button
Illumination level indication mode: Indicates the duty cycle for the illumination dimmer control of the gauge assembly.
Gauge dimmer control values: Headlights off: OFF
Headlights on: 01 (max low) through 22 (max high)
No. 5 button
Vehicle speed pulse indication mode: Indicates the Vehicle speed pulse.
AM/FM or FM button (Push and hold 5 sec.)
Reception level check mode: Indicates the reception level. When entering the reception level check mode, the AM/FM button or FM button is used to change the main/sub antenna.
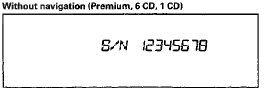
How to Obtain the Audio Unit Serial Number
NOTE: This procedure can only be done after the power has been disconnected once and reconnected to the audio unit, and the audio-HVAC display displays CODE. With the audio unit switched off, push and hold the preset button No. 1, No. 6 and the VOL PUSH PWR knob, then release. The audio unit displays the eight digit serial number (example 12345678). Use the eight digit serial number when using the interactive network (iN) to get the 5 digit anti-theft codes.
Serial Number

4. The self-diagnostic function ends when you turn the audio unit off or turn the ignition switch to LOCK (0).
NOTE: Any other diagnostic screens shown are for factory use only.
Display Specifications
Entry LCD lighting mode (press No. 3 button)
This diagnostic screen checks for segments that may be dead (off).
I he entire display must appear. If there are dead segments, replace the applicable display unit.
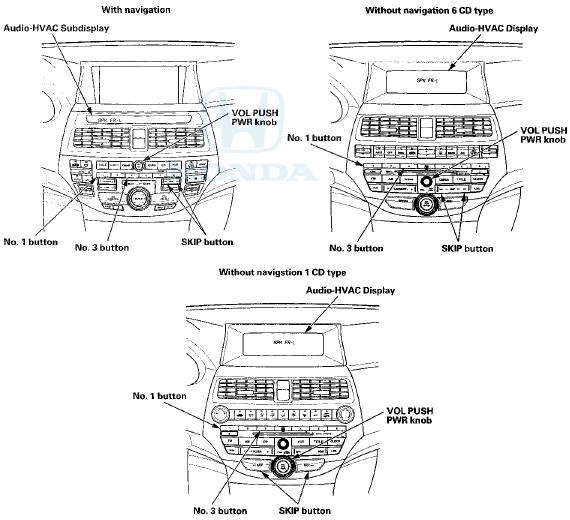
With navigation

Without navigation (Premium, 6 CD, 1 CD)
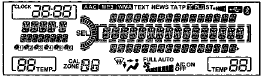
Entry LCD lights-outs mode (press No. 3 button)
This diagnostic screen checks for segments that may be stuck on.
The entire display must black. If the segments are stuck on, replace the applicable display unit.
With navigation

Without navigation (Premium, 6 CD, 1 CD)
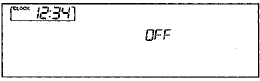
Illumination level (for the gauge illumination) indication (press No. 4 button)
This diagnostic screen checks the gauge illumination. If the headlights are off, the display reads OFF.
If the headlight are on, you should see a values between 01 (max low) and 22 max high.
When you d im and brighten the gauge, you should see this value change accordingly.
If it doesn't, check for B-CAN DTCs.
With navigation

Without navigation (Premium, 6 CD, 1 CD)
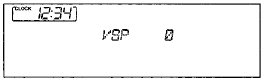
Vehicle speed pulse indication (press No. 5button)
This diagnostic screen checks that the audio unit is receiving the VSP indication.
When you drive the vehicle, the VSP indicates the vehicle speed in km/h.
With navigation

Without navigation (Premium, 6 CD, 1 CD)
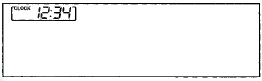
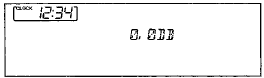
Reception level indication mode
This diagnostic screen checks the audio unit's reception level. This level then can be used in the diagnosis of audio unit reception quality. The reception level is displayed in decibels (dB).
Preparation:
• Park the vehicle outdoors in an appropriate location for good radio reception.
• Tune to a powerful local FM radio station then write down the radio station number.
• Tune to a powerful local AM radio station then write down the radio station number.
1. Enter the reception level indication mode in the self-diagnostic function.
2. Tune to the FM radio station you wrote down in Preperation using the TUNING knob, and note the decibel level of that station when you release the button.
Reception level indication (Push and hold 5 sec AM/FM or FM button.)
This diagnostic screen checks the audio units reception level that can used in diagnosis check the audio reception quality.
With navigation

Without navigation (Premium, 6 CD, 1 CD)
3. Press and release the A.SEL button to turn the AM/FM antenna amplifier off.
4. Note the decibel level of that station when you release the button.
5. Press and release the A.SEL button to turn the AM/FM antenna amplifier back on.
6. Press and hold the AM button for more than 5 seconds to enter the AM reception mode.
7. Tune to the AM radio station you wrote down in preperation using the TUNING knob, and note the decibel level of that station.
8. Press and release the A.SEL button to turn the antenna amplifier off.
9. Note the decibel level of that station when you release the button.
10. Press and release the A.SEL button to turn the AM/FM antenna amplifier back on.
11. Turn the ignition switch to LOCK(0) or audio unit off to exit the test mode.
12. Compare your results to a known-good, (make sure it is the same year and trim level) in the same location and direction, and under the same environmental conditions.
Speaker Check Mode
NOTE; • Not all self-diagnostic functions appear on all models.
• There may be other self-diagnostic functions that are for factory use only.
1. Turn the ignition switch to ON (II). Turn the audio unit off.
2. Push and hold the No. 1 and No. 3 buttons. While holding the buttons, push the VOL PUSH PWR knob to on. Release the buttons and the speaker check mode begins. A tone test should sound from one speaker.
NOTE: Make sure the volume is set to a normal or slightly higher than normal volume and set the balance and fader to the center position.
3. Each time you press the SKIP button, the test moves to the next speaker in the order listed.
Display Specifications
With Premium Audio System

Without Premium Audio System

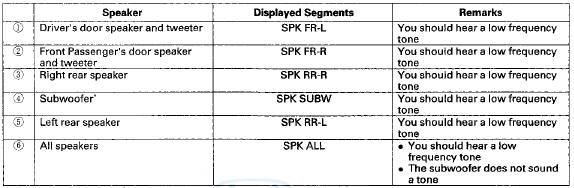
*: With Premium Audio System
4. The speaker check mode ends when you turn the audio unit off or turn the ignition switch to LOCK (0).
NOTE: Any other diagnostic screens are shown for factory use only.
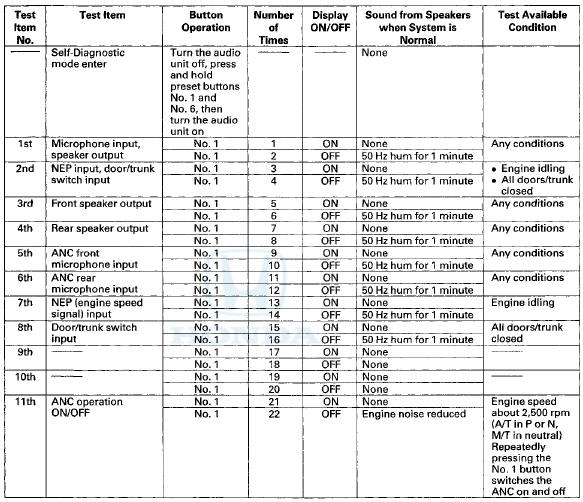
Active Woise Cancellation (ANC) S f stem Check Mode
NOTE: • Not all self-diagnostic functions appear on all models.
• There may be other self-diagnostic functions that are for factory use only.
• Only perform this test when you are guided from a troubleshooting procedure.
• The ANC function is not supported for 1 CD type.
• To restart the ANC check mode, turn the ignition switch to LOCK (0), then enter the check mode.
1. Turn the ignition switch to ON (II).
NOTE: Make sure the audio system is turned off.
2. Push and hold the No. 1 and No. 6 buttons. While holding the buttons, push the VOL PUSH PWR knob to ON.
3. Press the No. 1 button, the active noise cancellation (ANC) system check mode begins.
How to check the active noise cancellation system in this check mode
• While in this system check mode, press the No. 1 button to move to the next test item.
• Y o u must remember how many times you pressed the No. 1 button. The system will not show which test item you are doing.
• For test items 1 thru 10, the speaker will make a low-frequency hum (50 Hz) when the system is normal for more than 5 seconds up to 1 minute.
•When there is a failure in the system, the speaker will not make a low-frequency hum (50 Hz) or the hum will stop within 5 seconds for test items 1 thru 10.
• The check mode will be automatically cancelled when the time reaches 1 minute after the starting each test items, •When you once reach to test item 11th, the test will loop ON and OFF in the 11th test.
• This check mode ends when you start the engine (ignition switch in start (III) or turn the ignition switch to LOCK (0)), because the power to the audio system will be cut off.
• If you need to check test item 2nd, 7th and/or 11th, start the check mode with the engine idling. Other test items are available with the engine idling or stopped.
Active Noise Cancellation ON
With navigation

Active Noise Cancellation OFF
With navigation

Without navigation 6 CD type

Without navigation 6 CD type
4. The self-diagnostic function ends when the audio system is turned off, or the ignition switch is turned to LOCK (0).
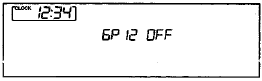
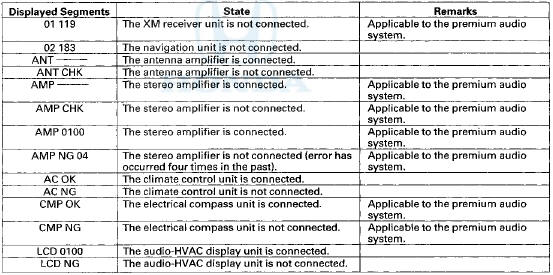
Communication Connection Check Mode
NOTE; • Not all self-diagnostic functions appear on all models.
• There may be other self-diagnostic functions that are for factory use only.
1. Turn the ignition switch to ON (II). Turn the audio unit off.
2. Push and hold the No. 1 and No. 6 buttons. While holding the buttons, push the VOL PUSH PWR knob to on. Release the buttons.
3. Press the No. 6 button, and the communication connection check mode begins.

4. Each time you press the No. 6 button, the communication connection state is displayed in the following order.
NOTE: If the audio-HVAC subdisplay or the audio-HVAC display is blank in all headlight positions, or blank only when the headlights are turned on, check for B-CAN DTCs.
Display Specifications (With navigation)
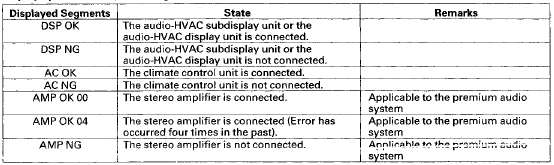
Display Specifications (Without navigation (Premium, 6 CD, 1 CD))
NOTE: Any other diagnostic screens are shown for the manufacturer's purpose only.
5. The self-diagnostic function ends when you turn the audio unit off or turn the ignition switch to LOCK (0).
 Circuit Diagram
Premium Audio System with navigation
Premium Audio System with navigation
Premium Audio System without navigation
Premium Audio System without navigation
Without Premium Audio Syst ...
 Error Codes
The audio system can display error codes when a problem is detected with the
audio disc changer, the audio disc, the
XM radio, or the anti-theft code.
CD Error Codes
XM Error Codes
Audio Uni ...
See also:
Driveshaft Disassembly
Special'Tools Required
•Threaded Adapter, 26 x 1.5 mm
07XAC-001030A
-Slide Hammer 5/8M-18 UNF, commercially available
-Bearing Puller, commercially available
-Boot Band Pliers, commercially ...
Clutch Pedal Position Switch
Test
M/T model
1. Disconnect the clutch pedal position switch 3P
connector (A).
2. Remove the clutch pedal position switch (B).
3. Check for continuity between the terminals according
to the table ...
Mainshaft Thrust Clearance Adjustment
Special Tools Required
- Mainshaft Holder 07GAJ-PG20110
- Mainshaft Base 07GAJ-PG20130
1. Remove the 72 mm shim (A) and oil guide plate M
from the transmission housing (B).
2. Thoroughly clea ...