 Honda Accord: Secondary Shaft Bearing
Replacement
Honda Accord: Secondary Shaft Bearing
Replacement
Special Tools Required
•Driver Handle, 15 x 135L 07749-0010000
•Attachment, 62 x 68 mm 07746-0010500
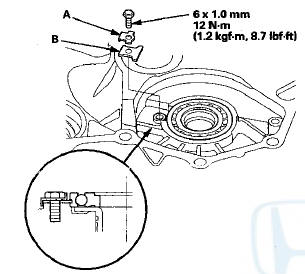
1. Remove the set plate bolt, then remove the lock washer (A) and the bearing set plate (B).
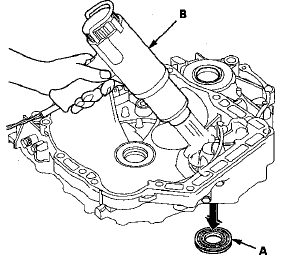
2. Remove the secondary shaft bearing (A) by heating the torque converter housing to about 212 В°F (100 В°C) using a heat gun (B). Do not heat the torque converter housing more than 212 В°F (100 В°C).
NOTE: Let the torque converter housing cool to normal temperature before installing the secondary shaft bearing.
3. Remove the ATF guide collar with the O-rings. Clean and dry the ATF guide collar surfaces and the torque converter housing if necessary.
4. Install new O-rings (A) on the ATF guide collar (B), then install the ATF guide collar in the torque converter housing.
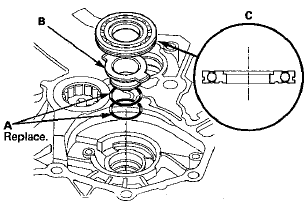
5. Install a new secondary shaft bearing (C) in the direction shown.
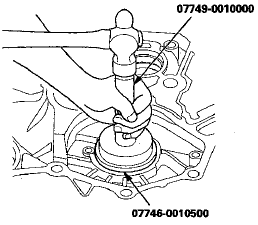
6. Install the secondary shaft bearing using the driver handle and the 62 x 68 mm attachment, and install it securely in the torque converter housing.
7. Check that the bearing groove aligns with the torque converter housing surface, then install the bearing set plate with aligning the bearing groove.
8. Install a new lock washer and the set plate bolt, then bend the lock tab of the lock washer against the bolt head.
 Countershaft Bearing Replacement
Special Tools Required
-Adjustable Bearing Puller, 2 5 - 4 0 mm 07736-A01000B
-Driver Handle, 15 x 135L 07749-0010000
-Attachment, 62 x 68 mm 07746-0010500
1. Remove the countershaft bearing using ...
 Selector Control Shaft Oil Seal
Replacement
Selector Control Shaft Oil Seal
Replacement
Special Tools Required
-Driver Handle, 15 x 135L 07749-0010000
-Oil Seal Driver Attachment 07947-ZV00100
1. Remove the oil seal (A) from the torque converter
housing (B).
2. Install a new oil s ...
See also:
Using a Booster Seat
A child who has outgrown a forwardfacing
child seat should ride in a
back seat and use a booster seat
until the lap/shoulder belt fits them
properly without the booster.
Some states, Canadi ...
Wheel Speed Sensor Replacement
Front
1. Turn the ignition switch to LOCK (0).
2. Release the clamp (A), then disconnect the wheel speed sensor connector (B).
3. Remove the bolts and the wheel speed sensor (C).
4. Install ...
DTC Troubleshooting
DTC indicator 1: An Open in the Air Mix
Control Motor Circuit
1. Turn the ignition switch to LOCK (0), and then to
ON (II).
2. Do the self-diagnostic function with the HVAC control
unit (see pa ...