 Honda Accord: Replacing a Front Side Marker Light Bulb
1. To change the bulb on the driver’s side, start the engine, turn the steering wheel all the way to the right, then turn off the engine. To change the bulb on the passenger’s side, turn the steering wheel to the left.
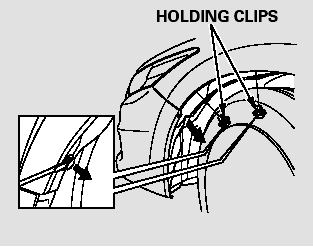
2. Use a flat-tip screwdriver to remove the two holding clips from the inner fender.
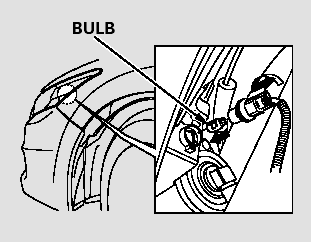
3. Remove the socket from the headlight assembly by turning it one-quarter turn counterclockwise.
4. Pull the burned out bulb straight out of its socket.
Push the new bulb straight into the socket until it bottoms.
5. Insert the socket back into the headlight assembly. Turn it clockwise to lock it in place.
6. Turn on the lights to make sure the new bulb is working.
7. Reinstall the inner fender cover.
Then reinstall the holding clips, and lock them in place by pushing on their centers.
 Replacing a Front Turn Signal/Parking Light Bulb
1. Open the hood.
To change the turn signal bulb on
the passenger’s side, remove the
engine coolant reserve tank by
pulling it out of its stay.
Driver’s side on V6 models
Remove t ...
 Replacing Rear Bulbs
1. Open the trunk.
Remove the screws in the center
of each of the two fasteners on the
side of the trunk lining. Pull the
lining back.
2. Determine which of the three
bulbs is burned out: ...
See also:
ATF Temperature Sensor
Test/Replacement
1. Raise the vehicle on a lift, or apply the parking brake,
block both rear wheels, and raise the front of the
vehicle. Make sure it is securely supported.
2. Remove the splash shield.
3. Disc ...
Audio System Theft Protection*
The audio system is disabled when it is disconnected from the power source,
such as
when the battery is disconnected or goes dead.
• Reactivating the audio system
1. Set the power mode to ON, ...
Hood Seal and Hood Molding
Replacement
NOTE: Take care not to scratch the hood.
1. Detach the clips (A) with a clip remover, then remove
the hood seal (B). On Canada models: Detach the clips
(C), then remove the hood molding (D).
2-d ...