 Honda Accord: Regulator Valve Body Disassembly,
Inspection, and Reassembly
Honda Accord: Regulator Valve Body Disassembly,
Inspection, and Reassembly
1. Clean all parts thoroughly in solvent and dry them with compressed air. Blow out all passages.
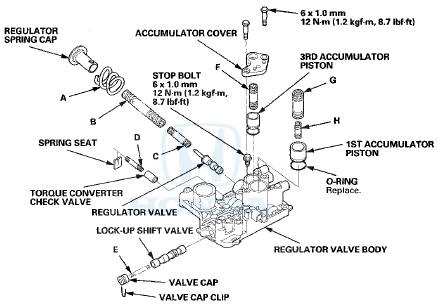
2. Inspect the valve body for scoring and damage.
3. Check all valves for free movement. If any fail to slide freely, do the valve body repair procedure (see page 14-275).
4. Hold the regulator spring cap in place while removing the stop bolt. The regulator spring cap is spring loaded.
5. Coat all parts with ATF during assembly.
6. Replace the O-rings with new ones.
7. When reassembling the valve body, align the hole in the regulator spring cap with the hole in the valve body, then press the spring cap into the valve body, and tighten the stop bolt.
SPRING SPECIFICATIONS

 ATF Pump Inspection
1. Install the ATF pump drive gear (A), the driven gear
(B), and the ATF pump driven gear shaft (C) in the
main valve body (D). Lubricate all parts with ATF, and
install the ATF pump driven gear wi ...
 Servo Body Disassembly, Inspection,
and Reassembly
Servo Body Disassembly, Inspection,
and Reassembly
1. Clean all parts thoroughly in solvent, and dry them with compressed air.
Blow out all passages.
2. Inspect the valve body for scoring and damage.
3. Check shift valve D for free movement. I ...
See also:
Random Play
To play the tracks on the current
disc in random order, select TRACK
RANDOM, and press ENTER on the
interface selector. As a reminder,
you will see RANDOM next to
TRACK on the screen. To tur ...
Accessory Power Socket Trim
Removal/Installation
Special Tools Required
KTC Trim Tool Set SOJATP2014*
*Available through the Honda Tool and
Equipment
Program; call 888-424-6857
NOTE:
- Take care not to scratch the console.
- Use the approp ...
Front Brake Pad Inspection and Replacement
Special Tools Required
Brake Caliper Piston Compressor 07AAE-SEPA101
Frequent inhalation of brake pad dust, regardless of
material composition, could be hazardous to your
health.
- Avoid breath ...