 Honda Accord: Rear Seat Armrest Beverage Holder
Replacement
Honda Accord: Rear Seat Armrest Beverage Holder
Replacement
Special Tools Required
KTC Trim Tool Set SOJATP2014*
* Available through the Honda Tool and Equipment Program; call 888-424-6857
4-door
NOTE: - Take care not to tear or damage the seat covers.
- Use the appropriate tool from the KTC trim tool set to avoid damage when removing components.
1. Push on the rear hooks (A) with the appropriate trim tool to pull up the armrest beverage holder (B), then release the hooks from the wire (C).
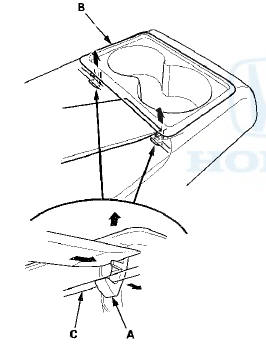
2. Release the front hooks (A) from the wire (B), then remove the armrest beverage holder (C).
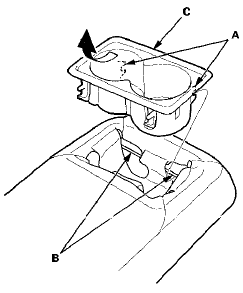
3. Install the beverage holder in the reverse order of removal. Make sure the front hooks are installed securely to the wire, then push down on the beverage holder, and install the rear hooks into the wire securely.
 Trunk Pass-through Lid Replacement
4-door
NOTE: Take care not to tear or damage the seat covers.
1. Fold down the rear seat-back.
2. Remove the screws, and release the hooks (A), then
remove the trunk pass-through lid (B).
3 ...
 Rear Seat-back Cover Replacement
2-door
NOTE:
- Put on gloves to protect your hands.
- Take care not to tear or damage the seat covers.
1. Remove the seat-back (see page 20-239).
2. Remove all of the head restraints.
3. ...
See also:
Dashboard
With Navigation System
Without Navigation System
...
Maximum Load Limit
The maximum load for your vehicle is 850 lbs (385 kg).
See Tire and Loading Information label attached to the driver's doorjamb.
This figure includes the total weight of all occupants, cargo, an ...
Brake Booster Replacement
1. Remove the cowl cover (see page 20-278).
2. Remove the strut brace (if equipped) (see page
20-306).
3. Remove the master cylinder (see page 19-26).
4. Disconnect the brake booster vacuum ...