 Honda Accord: Rear Seat Access Cable Replacement
2-door Passenger's Seat
NOTE: - Put on gloves to protect your hands.
- Take care not to kink the rear seat access cable.
- The right rear seat access cable is shown; the left rear seat access cable is similar.
1. Remove the front seat (see page 20-194).
2. Remove the seat cushion cover/pad (see page 20-226).
3. Note positions of the rear seat access cable (A), then remove the cable.
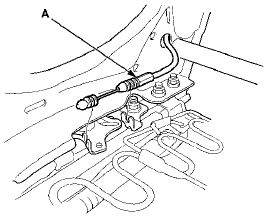
4. Remove the screw, then remove the rear seat access cable (A).
5 . Install the access cable in the reverse order of removal, a n d note these items: - Make sure the access cable is connected securely.
- Install the access cable in the same positions noted in step 3. Check the rear seat access operation: Make sure both of the seat tracks unlatches simultaneously and the seat slides forward when the seat-back is folded down.
 Front Seat Torsion Bar Replacement
2-door Driver's seat (manual height
adjustable seat)
NOTE:
- Put on gloves to protect your hands.
- Take care not to tear or damage the seat covers.
- When prying with a flat-tip screwdriver, ...
 Front Seat Frame Replacement
Driver's Seat
Front Seat Frame Replacement
Driver's Seat
Special Tools Required
KTC Trim Tool Set SOJATP2014*
*Available through the Honda Tool and
Equipment
Program; call 888-424-6857
SRS components are located in this area. Review the
SRS component ...
See also:
VSA Off Switch Test
1. Turn the ignition switch to LOCK (0).
2. Remove the driver's dashboard lower cover {see page
20-166).
3. Push out the VSA OFF switch (A) from the driver's
dashboard lower cover.
4. Check ...
DTC Troubleshooting
DTC P062F: Powertrain Control Module (PCM)
Internal Control Module Keep Alive Memory
(KAM) Error
NOTE: Before you troubleshoot record all freeze data
and any on-board snapshot with the HDS, and re ...
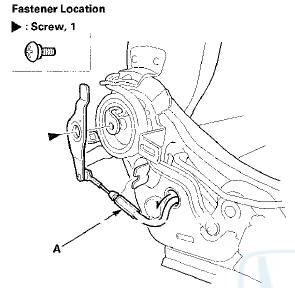
Lower Arm B Replacement
1 Raise and support the vehicle (see page 1-13).
2. Remove the rear wheel.
3. Remove the lower arm B mounting bolts, then
remove lower arm B.
NOTE: Use new mounting bolts during reassembly.
...