 Honda Accord: Rear Door Weatherstrip Replacement
4-door
NOTE; - Put on gloves to protect your hands.
- Take care not to scratch the door.
- Take care not to damage the front upper corner clip (black) and the rear upper corner clips (black) because they are not.available separately.
- Use a clip remover to remove the clips.
1 Remove the door checker mounting bolt (A) at the B-pillar.
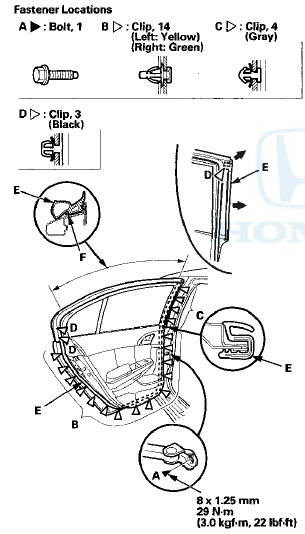
2. Detach the clips (B, C, D), and release the door weatherstrip (E) from the holder (F) of the door sash, then remove the weatherstrip.
3. Install the weatherstrip in the reverse order of removal, and note these items: - If the clips are damaged or stress-whitened, replace them with new ones.
- Push the clips into place securely.
- Make sure the door weatherstrip is installed in the holder securely.
-Apply medium strength liquid thread lock to the door checker mounting bolt before installation.
- Check for water leaks (see step 9 on page 20-57).
 Rear Door Outer Molding
Replacement
Rear Door Outer Molding
Replacement
Special Tools Required
KTC Trim Tool Set SOJATP2014*
- Available through the Honda Tool and Equipment
Program; call 888-424-6857
4-door
N O T E :
- If you remove the door outer molding, replace ...
 Door Glass Adjustment
NOTE: Check the door weatherstrip and the glass run
channel for damage or deterioration, and replace them if
necessary.
1. Place the vehicle on a firm, level surface when
adjusting the door glas ...
See also:
Passenger's Air Mix Control Motor
Replacement
1. Remove the glove box (see page 20-174).
2, Disconnect the 4P connector (A) from the power
transistor (B), and the 7P connector (C) from the
passenger's air mix control motor (D). Remove the
s ...
Wiper Arm/Nozzle Adjustment
4-door
1. Turn the wiper switch ON, and then back OFF.
2. W h e n t h e w i p e r a r m s s t o p at t h e p a r k p o s i t i o n , c
o n f i rm that t h e y a r e at t h e s t a n d a r d posi ...
Compatible iPod®, iPhone®, and USB Flash Drives
• iPod® and iPhone® Model Compatibility
This system may not work with all software versions
of these devices.
• USB Flash Drives
• Use a recommended USB flash drive of 256 MB or higher. ...