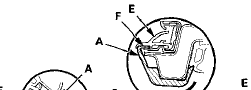
 Honda Accord: Rear Door Sash Inner Trim
Replacement
Honda Accord: Rear Door Sash Inner Trim
Replacement
4-door
NOTE: Take care not to scratch the door.
1. Remove the door panel (see page 20-38).
2. Lower the glass fully.
3. Remove the door sash inner trim (A).
-1. Pull back the outside edge of the trim to release the rear hook (B) from the door.
-2. Pull back along the outside edge of the trim to release the hooks or the hook strips (C) from the door glass opening flange at the quarter glass area and the roof area of the door sash.
-3. Release the hook (D) from the glass run channel (E) at the front corner of the door sash.
-4. Pull back along the outside edge of the trim to release the hooks or hook strip (F) from the door glass opening flange at the B-pillar area of the door sash.
-5. Release the front hook (G) from the door.
Japan-produced models
USA-produced models
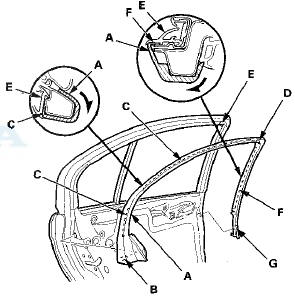
4. Install the trim in the reverse order of removal, and push the hooks or the hook strips into place securely.
 Rear Door Glass and Regulator
Replacement
Rear Door Glass and Regulator
Replacement
4-door
NOTE: Put on gloves to protect your hands.
1. Remove the door panel (see page 20-38).
2. Disconnect the power door lock actuator connector
(A), and detach the harness clips (B). Remove ...
 Rear Door Sash Outer Trim
Replacement
Rear Door Sash Outer Trim
Replacement
4-door
NOTE: Take care not to scratch the door.
1. Remove the door outer molding (see page 20-54).
2. Pull up the door sash outer trim (A) to release the trim
from the clips, and release the t ...
See also:
Replacing the High-mount Brake Light Bulb
1. Open the trunk, and remove the
socket from the light assembly by
turning it one-quarter turn counterclockwise.
2. Pull the bulb straight out of its
socket. Push the new bulb straight
int ...
Selecting a Memorized Position
To select a memorized position, do
this:
1. Make sure the parking brake is set
and the shift lever is in Park
(automatic).
2. Press the desired memory button
(1 or 2) until you hear a beep ...
Shift Lock Release
This allows you to move the shift
lever out of Park if the normal
method of pushing on the brake
pedal and pressing the release
button does not work.
1. Set the parking brake.
2. Remove the ...