 Honda Accord: Rear Door Outer Molding
Replacement
Honda Accord: Rear Door Outer Molding
Replacement
Special Tools Required
KTC Trim Tool Set SOJATP2014*
- Available through the Honda Tool and Equipment Program; call 888-424-6857
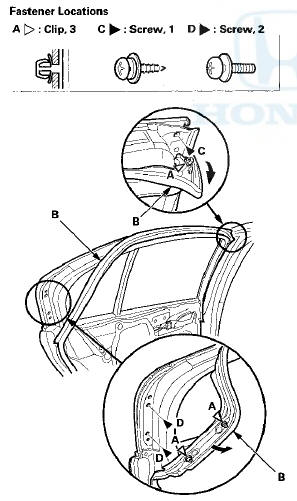
4-door
N O T E : - If you remove the door outer molding, replace it with a new one because it will bend during removal.
- Put on gloves to protect your hands.
- Take care not to scratch the door.
- Use the appropriate tool from the KTC trim tool set to avoid damage when removing components.
1. Detach the clips (A) with a clip remover, then pull back romn\/o th (C, D).
2. Pull out the upper edge of the door outer molding (A) from the edge of the sash, and cut the double-sided adhesive tape (B) with a utility knife, then remove the molding from the sash, and remove the molding from between the door glass outer weatherstrip (C) and the door.
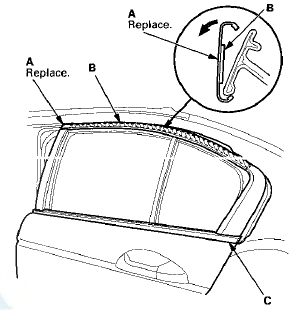
3. Scrape off remaining double-sided adhesive tape from the sash, then clean the sash surface with a shop towel dampened in isopropyl alcohol.
4. Install the door outer molding in the reverse order of removal, and note these items: - Insert the rear edge of the molding between the door glass outer weatherstrip and the door properly.
- Push adhesive areas into place securely.
- Make sure the upper and lower sides of the molding are catching the edges of the sash properly.
- Push the clips into place securely.
 Rear Door Glass Outer Weatherstrip
Replacement
Rear Door Glass Outer Weatherstrip
Replacement
4-door
NOTE:
- Put on gloves to protect your hands.
- Take care not to scratch the door.
1. Remove these items:
- Door panel {see page 20-38)
- Plastic cover, as needed (see step 3 on page 2 ...
 Rear Door Weatherstrip Replacement
4-door
NOTE;
- Put on gloves to protect your hands.
- Take care not to scratch the door.
- Take care not to damage the front upper
corner clip
(black) and the rear upper corner clips (black ...
See also:
Warm Up TWC Removal/Installation
1. Raise the vehicle on a lift.
2. Remove the secondary H02S (Sensor 2) (see page
11-197).
3. Remove the bolts (A).
4. Remove the WU-TWC bracket (B).
5. Lower the vehicle.
6. Remove th ...
Cruise Control Combination
Switch Test/Replacement
SRS components are located in this area. Review the
SRS component locations:
2-door fsee page 24-23)
4-door (see page 24-21)
Precautions and procedures (see page 24-25), in the SRS
before d ...
Vehicle Identification Number (VIN)
Your vehicle has a 17-digit vehicle identification number (VIN) used to
register your
vehicle for warranty purposes, and for licensing and insuring your vehicle. See
the
image below for the VI ...