 Honda Accord: Rear Brake Disc Replacement
NOTE: Keep any grease off the brake disc and the brake pads.
1. Raise and support the vehicle (see page 1-13).
2. Remove the rear wheel.
3. Release the parking brake lever fully.
4. Loosen the parking brake cable adjusting nut (see page 19-8).
5. Remove the flange bolt (A) from the arm (B).
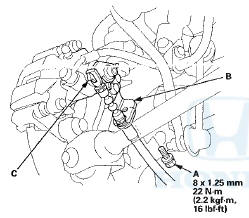
6. Disconnect the parking brake cable from the lever (C).
7. Remove the brake hose mounting bolt (A).
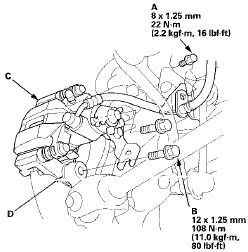
8. Remove the brake caliper bracket mounting bolts (B), and remove the caliper assembly (C) from the knuckle. To prevent damage to the caliper assembly or brake hose, use a short piece of wire to hang the caliper assembly from the undercarriage. Do not twist the brake hose and the parking brake cable excessively.
NOTE: Make sure the washers (D) are in position on reassembly, if they are removed (see step 8 on page 18-39).
9. Remove the brake disc flathead screws (A),
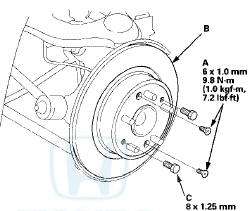
10. Remove the brake disc (B) from the hub bearing unit.
NOTE: If the brake disc is stuck to the hub bearing unit, thread two 8 x 1.25 mm bolts (C) into the brake disc to push it away from the hub bearing unit. Turn each bolt 90 degrees at a time to prevent the brake disc from binding.
11 . Install the brake disc in the reverse order of removal, and note these items: - Adjust the parking brake (see page 19-8).
- Before installing the brake disc, clean the mating surfaces between the hub bearing unit and the inside of the brake disc.
12. Inspect the brake disc runout (see page 19-33).
13. After install the brake caliper, make sure the clearance between the lower arm B and the parking brake cable is more than 5 mm (0.20 in).
14. Clean the mating surfaces between the brake disc and the inside of the wheel, then install the rear wheel.
 Rear Brake Disc Inspection
Runout
1. Raise and support the vehicle (see page 1-13).
2. Remove the rear wheels.
3. Remove the brake pads (see page 19-31),
4. Inspect the brake disc to wheel surface for damage
and cracks ...
 Rear Brake Caliper Overhaul
Frequent inhalation of brake pad dust, regardless of material composition,
could be hazardous to your health.
- Avoid breathing dust particles.
- Never use an air hose or brush to clean brake ...
See also:
Audio/Information Screen
Displays the audio status and wallpaper. From this screen, you can go to
various
setup options.
• Switching the Display
Press the (display) button to
change the display.
• Audio
Shows ...
Courtesy Lights
Your vehicle has a courtesy light in
the ignition switch. This light comes
on when you open the driver’s door.
It fades out in about 30 seconds after
the door is closed. ...
Rocker Arm and Shaft Disassembly/Reassembly
NOTE:
- Identify each part as it is removed so that each item can be
reinstalled in its original locations,
a Inspect the rocker arm shaft and rocker arms (see page 6-83).
- I ...