 Honda Accord: Radiator and A/C Condenser Fan
Common Circuit Troubleshooting
NOTE: • Do not use this troubleshooting procedure if only one fan is inoperative, or if the A/C compressor is inoperative. Refer to the symptom troubleshooting index.
• Before doing symptom troubleshooting, check for powertrain DTCs (see page 11-3).
1. Check the No. 3 - 6 (MAIN FAN MTR) (30 A), No. 5 (20 A), and No. 21 (7.5 A) fuses in the under-hood fuse/relay box, and the No. 16 (7.5 A) fuse in the driver's under-dash fuse/relay box.
Are the fuses OK? YES
-Go to step 2.
NO
-Replace the fuse(s), and recheck.
2. Turn the ignition switch to ON (II).
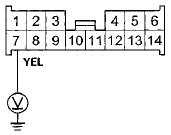
3. Measure the voltage between the under-hood fuse/relay box connector B (14P) terminal No. 7 and body ground.
UNDER-HOOD FUSE/RELAY BOX CONNECTOR B (14P)

Wire side of female terminals
Is there battery voltage? YES
-Go to step 4.
NO
-Replace the under-hood fuse/relay box (see page 22-85).
4. Turn the ignition switch to LOCK (0).
5. Jump the SCS line with the HDS.
NOTE: This step must be done to protect the engine control module/powertrain control module (ECM/PCM) from damage.
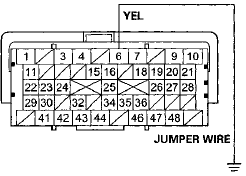
6. Disconnect ECM/PCM connector A (49P).
7. Connect the ECM/PCM connector A (49P) terminal No. 6 to body ground with a jumper wire.
ECM/PCM CONNECTOR A (49P)

Terminal side of female terminals
8. Turn the ignition switch to ON (II).
Do the A/C condenser and the radiator fans run? YES
-Check for loose wires or poor connections at ECM/PCM connector A (49P) terminal No. 6. If the connections are good, substitute a known-good ECM/PCM, and recheck. If the symptom/indication goes away, replace the original ECM/PCM (see page 11-204J.
NO-
Repair an open in the wire between the under-hood fuse/relay box and the ECM/PCM.
 A/C Condenser Fan Circuit
Troubleshooting
NOTE:
• Do not use this troubleshooting procedure if the
radiator fan and/or the A/C compressor is inoperative.
Refer to the symptom troubleshooting index.
• Before doing symptom tro ...
 Radiator and A/C Condenser Fan Low
Speed Circuit Troubleshooting
NOTE:
• Do not use this troubleshooting procedure
if the A/C
compressor is inoperative. Refer to the symptom
troubleshooting index.
• Before performing symptom troubleshooting, check ...
See also:
HVAC Control Unit
Removal / Installation
1. Remove the audio unit (see page 23-115).'
2. Remove the self-tapping screws. If necessary, replace
the bulbs (A).
3. While holding the HVAC control unit (A), firmly press
the center of one of ...
Random Play
To play the tracks on the current
disc in random order, select TRACK
RANDOM, and press ENTER on the
interface selector. As a reminder,
you will see RANDOM next to
TRACK on the screen. To tur ...
Passenger's Air Mix Control Motor
Replacement
1. Remove the glove box (see page 20-174).
2, Disconnect the 4P connector (A) from the power
transistor (B), and the 7P connector (C) from the
passenger's air mix control motor (D). Remove the
s ...
