 Honda Accord: Pump Replacement
1. Place a suitable container under the vehicle to catch any spilled fluid.
2. Drain the power steering fluid from the reservoir (see page 17-28).
3. Remove the drive belt (A) from the pump pulley (see page 4-30).
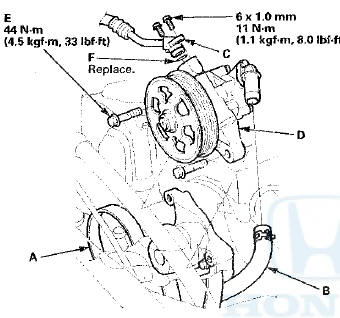
4. Cover the auto-tensioner, the alternator, and the A/C compressor with several shop towels to protect them from spilled power steering fluid. Disconnect the pump inlet hose (B) and the pump outlet hose (C) from the pump (D), and plug them. Take care not to spill the fluid on the vehicle. Wipe off any spilled fluid at once. Do not turn t h e steering wheel with the pump removed.
5. Remove the pump mounting bolts (E), then remove the pump.
6. Cover the opening of the pump with a piece of tape to prevent foreign material from entering the pump.
7. Transfer the pump inlet hose and the pump outlet hose from the original pump onto the new pump with a new O-ring (F).
8. Loosely install the pump in the pump bracket with the mounting bolts, then tighten the pump fittings to the specified torque.
9. Tighten the pump mounting bolts to the specified torque.
10. Install the drive belt (A) (see page 4-30).
Note these items during drive belt installation: -Inspect the belt for wear and cracks. Replace the belt if necessary.
-Make sure that the belt is properly positioned on the pulleys (B).
-Do not get power steering fluid or grease on the auto-tensioner, the alternator, the A/C compressor, and the drive belt, or the pulley faces. Clean off any fluid or grease before installation.
11. Fill the reservoir to the upper level line (see page 17-28).
12. Start the engine, and check for leaks.
 Power Steering Hose, Line, and Pressure Switch
Replacement
Power Steering Hose, Line, and Pressure Switch
Replacement
Note these items during installation:
-Connect each hose to the corresponding line securely until it contacts the
stop on the line. Install the clamp or
adjustable clamp at the specified distance ...
 Pump Overhaul
Exploded View
Replace the pump as an assembly if any of the parts indicated with an
asterisk (*) are worn or damaged.
Special Tools Required
-Attachment, 32 x 35 mm 07746-0010100
-Driver Handl ...
See also:
DTC Troubleshooting
PTC 11 -1x { " x " can be 0 ,2 thru 3 or A thru F):
Open io the Driver's Airbag First Inflator
DTC 11-4x ("x" can be 0,2 thru 9 or A thru F):
Open in the Driver's Airbag Second ...
Carpet Replacemen
Special Tools Required
KTC Trim Tool Set SOJATP2014*
*Available through the Honda Tool and
Equipment
Program; call 888-424-6857
One-piece Type Carpet (4-dВ©or)/Two-piece
Type Front Carpet (2- ...
Ignition Switch Replacement
NOTE: SRS components are located In the area. Review
the SRS component locations 4-door (see page 24-21),
2-door (see page 24-23), and precautions and
procedures (see page 24-25) before doing repai ...