 Honda Accord: Playing XM® Radio
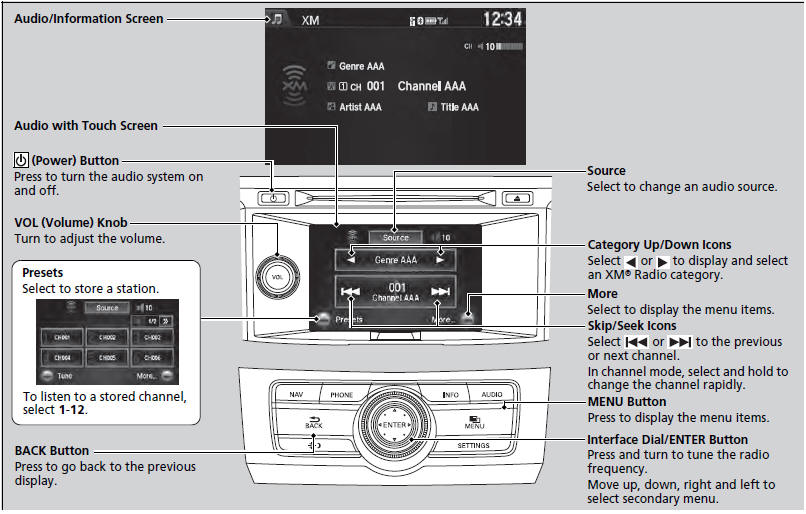
• To Play the XM® Radio
1. Select the XM® mode.

2. Press the MENU button.
3. Rotate  to select XM Tune
Mode, then press
to select XM Tune
Mode, then press  .
.
4. Rotate  to select Channel
Mode or Category Mode, then press
to select Channel
Mode or Category Mode, then press
 .
.
5. Rotate  to select Channel
List, then press
to select Channel
List, then press  .
.
6. Rotate  to select a channel from
a list, then press
to select a channel from
a list, then press  .
.

2. Select More.
3. Select Tune Mode.
4. Select CH Channel Mode or CAT Category Mode.
5. Select a channel using the  icons on the tune mode screen or
the preset numbers (1-12) on the preset mode screen.
icons on the tune mode screen or
the preset numbers (1-12) on the preset mode screen.
You can control the XM® radio using voice commands.
In the channel mode, all available channels are selectable. In the category mode, you can select a channel within a category (Jazz, Rock, Classical, etc.).
There may be instances when XM® Radio does not broadcast all the data fields (artist name, title). This does not indicate a problem with your audio system.
• Preset Memory
To store a station:
1. Tune to the selected station.

2. Press the MENU button.
3. Rotate  to select Save Preset,
then press
to select Save Preset,
then press  .
.
4. Rotate  to select the preset
number you want to store that station, then press and hold
to select the preset
number you want to store that station, then press and hold
 .
.

2. Select More.
3. Select Save Preset.
4. Select the preset number you want to store that station.
You can store 12 XM® stations into the preset memory.
 Playing AM/FM Radio
• Preset Memory
To store a station:
1. Tune to the selected station.
2. Press the MENU button.
3. Rotate to select Save Preset,
then press .
4. Rotate to select the preset
number you ...
 Playing a CD
Your audio system supports audio CDs, CD-Rs and CD-RWs in either MP3, WMA, or
AAC*1 format. With the CD loaded, select the CD mode.
• How to Select a File from the Music Search List
(MP3/WMA/ ...
See also:
Clutch Clearance Inspection
Special Tools Required
Clutch Compressor Attachment 07ZAE-PRP0100
1. Inspect the clutch piston, the clutch discs, the clutch
plates, and the clutch end-plate for wear and damage
(see page 14-303), ...
Shift Lever Housing Replacement
NOTE:
- Use the appropriate tool from the KTC trim tool set to
avoid damage when removing components.
- Take care not to scratch the center console,
dashboard, and related parts.
1. Remove th ...
Multi-Information Display Warning andInformation Messages
The following messages appear only on the multi-information display. Press
the (information) button to see the
message again
with the system message indicator on.
...