 Honda Accord: Owner’s Maintenance Checks
You should check the following items at the specified intervals. If you are unsure of how to perform any check, turn to the appropriate page listed.
Engine oil level Check every time you fill the fuel tank.
Engine coolant level Check the radiator reserve tank every time you fill the fuel tank.
Automatic transmission Check the fluid level monthly.
Brakes Check the fluid level monthly.
Tires Check the tire pressure monthly. Examine the tread for wear and foreign objects.
Lights Check the operation of the headlights, parking lights, taillights, high-mount brake light, and license plate lights monthly.
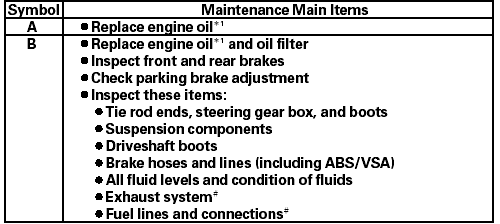
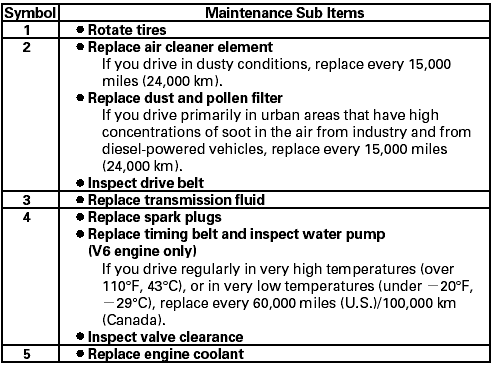
* 1 : If themessage ‘‘SERVICE’’ does not appear more than 12months after the display is reset, change the engine oil every year.
# : See information onmaintenance and emissions warranty in the center column.
NOTE: Independent of theMaintenanceMinder information, replace the brake fluid every 3 years.
Inspect idle speed every 160,000miles (256,000 km).
Adjust the valves during services A, B, 1, 2, or 3 if they are noisy.
 Important Maintenance Precautions
If you have the required service
done but do not reset the display, or
reset the display without doing the
service, the system will not show the
correct maintenance intervals. This
can lead ...
 Fluid Locations
4-cylinder models
V6 models ...
See also:
Output Shaft (Countershaft) Speed
Sensor Replacement
NOTE: For A/T models (see page 14-188).
M/T
1. Disconnect the output shaft (countershaft) speed
sensor 3P connector (A).
2. Remove the output shaft (countershaft) speed sensor
(B).
3. Instal ...
Emergency Towing
Call a professional towing service if you need to tow your vehicle.
• Flat bed equipment
The operator loads your vehicle on the back of a truck.
This is the best way to transport your vehicle.
...
Trunk Lid Adjustment
1. Remove the rear shelf (see page 20-128).
2. Pry up the notches (A) to release the rear hooks (B), and pull up the cap (C)
to release the side hooks (D), then remove
the cap.
3. Slightly lo ...