 Honda Accord: Oil Pressure Test
NOTE: If the low oil pressure warning indicator stays on with the engine running, check the engine oil level. If the oil level is correct, do the following test.
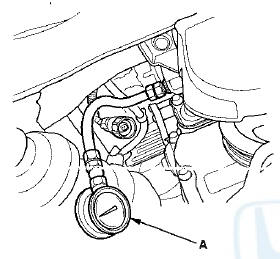
1. With the engine stopped, remove the oil pressure switch (see page 8-9), and install an oil pressure - gauge (A).
2. Start the engine. Shut it off immediately if the gauge registers no oil pressure. Repair the problem before continuing..' 3. Allow the engine to reach operating temperature (fan comes on at least twice). The pressure should be:
Engine Oil Temperature: 176 Р’В°F (80 Р’В°C)
Engine Oil Pressure:
At idle: 69 kPa (0.7 kgf/cm2,10.0 psi) min.
At 3,000 rpm: 304 kPa (3.1 kgf/cm2,44 psi) min.
4. If the oil pressure is out of specifications, inspect these items: - Blocking of oil filter.
- Blocking of oil screen.
- Inspect the oil pressure relief valve (see page 8-16).
- Inspect the oil pump (see page 8-18).
 Oil Pressure Switch Replacement
1. Disconnect the oil pressure switch connector (A), then
remove the oil pressure switch (B).
2. Remove any old liquid gasket from the switch and
switch mounting hole.
3. Apply a very small am ...
 Engine Oil Lewel Check
1. Park the vehicle on level ground, and start the engine.
Hold the engine speed at 3,000 rpm with no load (in N
or P (A/T model) or Neutral (M/T model)) until the
radiator fan comes on, then tur ...
See also:
AhaTM Radio
If an error occurs while playing AhaTM Radio, you may see the following error
messages.
If you cannot clear the error message, contact a dealer.
...
Customer Service Information
Honda dealership personnel are
trained professionals. They should
be able to answer all your questions.
If you encounter a problem that your
dealership does not solve to your
satisfaction, pl ...
Visual Index
...