 Honda Accord: ODS Unit Replacement
Removal
1. Do t h e battery t e r m i n a l disconnection procedure (see page 22-91), t h e n w a i t at least 3 minutes before s t a r t i ng work.
2. Remove t h e f r o n t passenger's seat (see page 20-194).
3. T u r n over t h e seat-back cover/pad as needed: • 4-door (see page 20-221) • 2-door (see page 20-213) 4. Remove t h e cover (A), t h e n disconnect t h e ODS unit 18P connector (B) a n d OPDS sensor connectors (C) from t h e ODS unit (D).
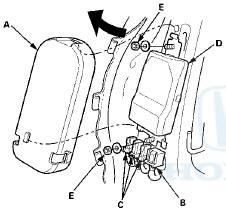
5. Remove t h e t w o washers, nuts (E), a n d t h e ODS unit.
Installation
1. Place t h e ODS unit (A) o n t h e seat-back f r a m e . Install t h e t w o washers and nuts, a n d t o r q u e t h e t w o nuts (B) , t h e n connect t h e ODS unit harness 18P connector (C) and OPDS sensor connectors (D) t o t h e ODS unit.
Reinstall t h e cover (E).
2. Install t h e seat-back cover cover/pad in t h e reverse order of removal: • 4-door (see page 20-221) • 2-door (see page 20-213) 3. Install t h e f r o n t passenger's seat (see page 20-200).
4. Do t h e battery t e r m i n a l reconnection procedure (see page 22-91).
5. Clear any DTCs w i t h t h e HDS (see page 24-38).
6. Set t he seat-back in t h e normal p o s i t i o n , a n d make sure t h e r e is n o t h i n g o n t h e f r o n t passenger's seat.
7 Do t he ODS unit i n i t i a l i z a t i on (see page 24-40).
8. C o n f i rm proper SRS operation: T u r n t he i g n i t i on s w i t c h t o ON (II); t h e SRS indicator should come on f o r about 6 seconds and t h e n g o off.
 Front Passenger's Weight Sensor Replacement
4-Door
Removal
NOTE;
• Removal of the front passenger's weight
sensors must
be done a c c o r d i n g to Precautions and Procedures (see
page 24-25).
•The front passenger' s weight ...
 Front Impact Sensor Replacement
Removal
1. Do t h e battery t e r m i n a l d i s c o n n e c t i o n procedure (see
page 22-91), t h e n w a i t at least 3 m i n u t e s before
s t a r t i ng work.
2. Remove t h e f r o n t b ...
See also:
Additional Safety Precautions
Do not attempt to deactivate your airbags.
Together, airbags and seat belts provide the best
protection.
Do not tamper with airbag
components or wiring for any reason.
Tampering could cause
t ...
Valve Seat Reconditioning
1. Inspect the valve stem-to-guide clearance (see page
6-88). If the valve guides are worn, replace them (see
page 6-88) before cutting the valve seats.
2. Renew the valve seats in the cylinder h ...
Driver's Dashboard Lower Cover
Removal/Installation
Special Tools Required
KTC Trim Tool Set SOJATP2014*
* Available through the Honda Tool and
Equipment
Program; call 888-424-6857
NOTE;
- Take care not to scratch the dashboard or the related
p ...