 Honda Accord: Moonroof Control Unit input Test
NOTE; If the moonroof works OK manually, but will not work in AUTO, or reverses frequently (obstacle detection), reset the moonroof (see page 22-371) before proceeding with the input test 1. Turn the ignition switch to LOCK (0).
2. Remove the headliner (see page 20-140).
3. Disconnect the 14P connector (A) from the moonroof control unit/motor (B).

4. Inspect the connector and socket terminals to be sure they are all making good contact.
• If the terminals are bent, loose or corroded, repair them as necessary, and recheck the system.
• If the terminals look OK, go to step 5.
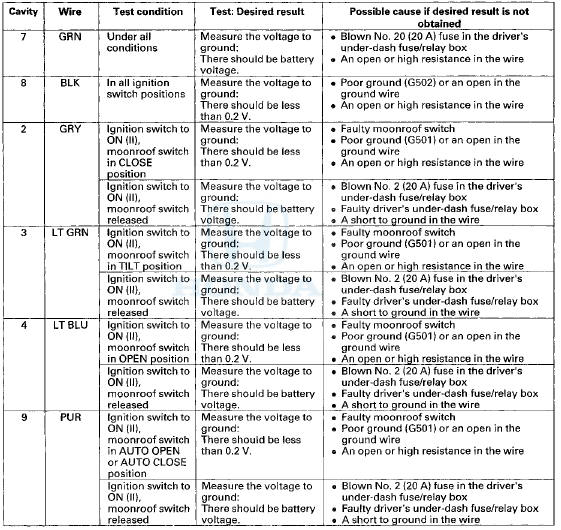
5. With the connector still disconnected/do these input tests at the following connector.
• If any test indicates a problem, find and correct the cause, then recheck the system.
• If all the input tests prove O K , go to step 6.

6. Reconnect the connector to the control unit and do these input tests at the following connector.
• If any test indicates a problem, find and correct the cause, then recheck the system.
• If all the input tests prove OK, go to step 7.
7. If all the input tests are OK and multiple failures are found, replace the moonroof control unit/motor assembly (see page 20-96). If the problem is related to the key-off operation, go to the driver's MICU input test (see page 22-176), and passenger's MICU input test (see page 22-180).
 Circuit Diagram
...
 Moonroof Switch Test/Replacement
1. Remove the front Individual map lights (see page
22-258).
2. Disconnect the moonroof switch 12P connector (A)
and map light 3P connector (B).
3. Remove the moonroof switch (C) from the map ...
See also:
Receiver/Dryer Desiccant
Replacement
NOTE: Install the receiver/dryer as quickly as possible to
prevent the system from absorbing moisture from the
air.
1. Remove the A/C condenser (see page 21 -77).
2. Remove the bolts from the ...
Rocker Arm Assembly Removal
1 Remove the cam chain (see page 6-62).
2. Loosen the rocker arm adjusting screws (A).
3. Remove the camshaft holder bolts. To prevent
damaging the camshafts, loosen the bolts, in
sequence, tw ...
Maximum Load Limit
The maximum load for your vehicle is 850 lbs (385 kg).
See Tire and Loading Information label attached to the driver's doorjamb.
This figure includes the total weight of all occupants, cargo, an ...