
 Honda Accord: MIL Circuit Troubleshooting
1. Turn the ignition switch to ON (II).
2. Do the gauge self-diagnostic function (see page 22-332).
Does the MIL indicator flash? YES
-Go to step 3.
NO
-Substitute a known-good gauge control module, and recheck. If the symptom/indication goes away with a known-good gauge control module, replace the original gauge control module (see page 22-351 ) . 3. Connect the HDS to the DLC (see page 11-3).
4. Check the SCS in the DATA LIST with the HDS.
Is a short indicated? YES
-Go to step 5.
NO
-Update the ECM/PCM if it does not have the latest software (see page 11-203), or substitute a known-good ECM/PCM (see page 11-7), then recheck.
If the symptom/indication goes away and the ECM/PCM was updated, troubleshooting is complete.
If the symptom/indication goes away and the ECM/PCM was substituted, replace the original ECM/PCM (see page 11-204).
5. Turn the ignition switch to LOCK (0).
6. Disconnect ECM/PCM connector A (49P), then disconnect the HDS.
7. Check for continuity between ECM/PCM connector terminal A32 and body ground.
ECM/PCM CONNECTOR A (49P)
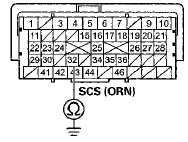
Terminal side of female terminals
Is there continuity? YES
-Repair short in the wire between the ECM/PCM (A32) and the DLC.
NO
-Update the ECM/PCM if it does not have the latest software (see page 11 -203), or substitute a known-good ECM/PCM (see page 11-7), then recheck.
If the symptom/indication goes away and the ECM/PCM was updated, troubleshooting is complete.
If the symptom/indication goes away and the ECM/PCM was substituted, replace the original ECM/PCM (see page 11-204).
 F-CAN Circuit Troubleshooting
1. Turn the ignition switch to LOCK (0).
2. Jump the SCS line with the HDS.
3. Disconnect ECM/PCM connector A (49P).
4. Measure the resistance between ECM/PCM connector
terminals A3 and A4.
...
 DLC Circuit Troubleshooting
NOTE: If you suspect the HDS or the HDS DLC cable may
be the source of the communication probrem, verify that
they are working properly by connecting them to a
known-good, like vehicle and system, ...
See also:
Front Door Latch Replacement
NOTE: Put on gloves to protect your hands.
1. Remove the door panel and the inner handle:
- 2-door ( s e e p a g e 20-12)
- 4-door (see page 20-17)
2. Remove the plastic cover, as needed (see st ...
Recommended CDs
• Use only high-quality CD-R or CD-RW discs labeled for audio use.
• Use only CD-R or CD-RW discs on which the recordings are closed.
• Play only standard round-shaped CDs.
• CDs with M ...
Disc Scan
When you press the SCAN side of
the SCAN/A. SEL bar repeatedly
until you see D-SCAN in the center
display, or push the interface
selector to the right, the first track of
the current disc pl ...