 Honda Accord: Middle Floor Undercover
Replacement
Honda Accord: Middle Floor Undercover
Replacement
Left Side
NOTE: - Put on gloves to protect your hands.
- Take care not to scratch the body.
1. Remove the bolts and release the hook (A), then remove the left middle floor undercover (B).
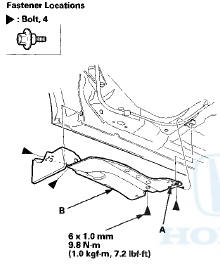
2. Install the undercover in the reverse order of removal, and first attach the hook, and set the bolts starting at the rear.
Right Side
NOTE: - Put on gloves to protect your hands.
- Take care not to scratch the body.
1. Remove the bolts and the nut, and release the hooks (A) , then remove the right middle floor undercover (B) .
2. Install the undercover in the reverse order of removal, and first attach the hooks, and set the bolts starting at the rear.
 Front Fender Fairing Replacement
For Some Models
NOTE;
- Take care not to scratch the body.
- Put on gloves to protect your hands.
1. Remove the front Inner fender as needed (see page
20-290).
2. From the wheel arch, rele ...
 Fuel Pipe Protector Replacement
NOTE:
- Put on gloves to protect your hands.
- Take care not to scratch the body.
- When prying with a flat-tip screwdriver, wrap it with
protective tape to prevent damage.
1. Remove the le ...
See also:
Additional Safety Precautions
Two people should never use the
same seat belt. If they do, they
could be very seriously injured in a
crash.
Do not put any accessories on seat belts.
Devices intended to improve occupant comf ...
ATF Filter Replacement
NOTE: The ATF filter is not a scheduled maintenance
item. Replace the filter only if it is leaking, or
contaminated, or when the transmission is being
overhauled or replaced with a remanufactured u ...