 Honda Accord: Master Cylinder Replacement

- Do not spill brake fluid on the vehicle; It may damage the paint. If brake fluid gets on the paint, wash It off Immediately with water.
- Be careful not to damage or bend the brake lines during removal and installation.
- After removal; plug the ends of the hoses and the joints to prevent spilling brake fluid.
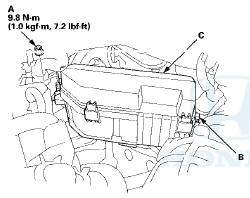
1. Remove the under-hood fuse/relay box mount nut (A) and release the clip (B), then move the under-hood fuse/relay box (C) aside.
2. Remove the reservoir cap and the brake fluid from the master cylinder reservoir with a syringe.
3. Disconnect the brake fluid level switch connector (A).

4. Disconnect the brake lines (B) from the master cylinder (C). To prevent spills, cover the hose joints with clean rags or shop towels.
5. Remove the master cylinder mounting nuts (D) and the washers (E).
6. Remove the master cylinder from the brake booster (F). Be careful not to bend or damage the brake lines when removing the master cylinder.
7. Remove the rod seal (G) from the master cylinder.
NOTE: During installation, set a new rod seal onto the master cylinder with its grooved side (H) toward the master cylinder.
8. Install the master cylinder in the reverse order of removal, and note these items: - Coat the inner bore lip and the outer circumference of the new rod seal with the Shin-Etsu silicone grease (P/N 08798-9013).
- Make sure not to get any silicone grease on the terminal part of the connectors and switches, especially if you have silicone grease on your hands or gloves.
- Check the brake pedal height and free play after installing the master cylinder, and adjust it if necessary (see page 19-6).
9. Bleed the brake system (see page 19-9).
10. Spin the wheels to check for brake drag.
 Front Brake Caliper Overhaul
Frequent inhalation of brake pad dust, regardless of material composition,
could be hazardous to your health.
- Avoid breathing dust particles.
- Never use an air hose or brush to clean brake ...
 Master Cylinder Inspection
1. Remove the master cylinder (see page 19-26).
2. Inspect and note these items:
- Before reassembling, check that all parts are free of
dirt and other foreign particles.
- Do not try to disas ...
See also:
Test/Replacement
EX-L, EX-L PZEV models
1. Remove the cover (A), then disconnect BP connector
(B).
2. Turn the ignition switch to ON (II).
3. Measure the voltage between terminal No. 2 and
body ground.
вР...
To Stop Playing a USB Flash Memory Device
To play the radio, press the FM/AM,
or
button. Press the CD button
to switch to the disc mode. Press the
AUX button to switch back to the
USB.
If you reconnect the same USB flash
memory ...
Slave Cylinder Replacement
NOTE:
- Use fender covers to avoid damaging painted
surfaces.
- Do not spilt brake fluid on the vehicle; it may damage
the paint or plastic. If brake fluid does contact the paint
or plastic, wa ...