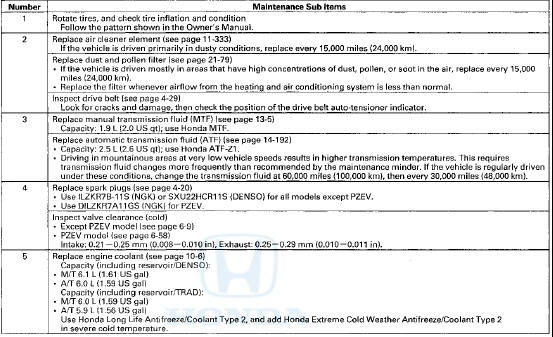
 Honda Accord: Maintenance Sub Items
SUPPLEMENTAL RESTRAINT SYSTEM (SRS) {if engine electrical maintenance is. required)
The Accord SRS includes a driver's airbag in the steering wheel hub, a passenger's airbag in the dashboard above the glove box, seat belt tensioners in the front seat belt retractors, side curtain airbags in the sides of the roof, and side airbags in the front seat-backs. Information necessary to safely service the SRS is Included in this Service Manual. Items marked with an asterisk (*) on the contents page include or are located near SRS components. Servicing, disassembling, or replacing these items requires special precautions and tools, and should be done by an authorized Honda dealer.
- To avoid rendering the SRS inoperative, which could lead to personal injury or death in the event ot a severe frontal or side collision, all SRS service work should be done by an authorized Honda dealer.
- Improper service procedures, including incorrect removal and installation of the SRS, could lead to personal injury caused by unintentional deployment of the airbags, side airbags, and/or side curtain airbags.
- Do not bump or impact the SRS unit, front impact sensors, side impact sensors, or rear safing sensor, especially when the ignition switch is in ON (II), or for at least 3 minutes after the ignition switch Is turned to LOCK (0); otherwise, the system may fail In a collision, or the airbags may deploy.
- SRS electrical connectors are identified by yellow color coding. Related components are located in the steering column, center console, dashboard, dashboard lower cover, In the dashboard above the glove box, In the front seats, in the roof side, and around the floor. Do not use electrical test equipment on these circuits.
 Maintenance Main Items
If message "SERVICE" does not appear more than 12 months after the display is
reset change the engine oil every year.
NOTE:
- Independent of the maintenance messages in the smart maint ...

See also:
Heater Unit/Core Replacement
SRS components are located in this area. Review the
SRS component locations (see page 24-21) and the
precautions and procedures (see page 24-25) before
doing repairs or service.
1. Do the batter ...
DTC Troubleshooting
PTC 11 -1x { " x " can be 0 ,2 thru 3 or A thru F):
Open io the Driver's Airbag First Inflator
DTC 11-4x ("x" can be 0,2 thru 9 or A thru F):
Open in the Driver's Airbag Second ...
Resetting the Engine Oil Life Display
Your dealer will reset the display
after completing the required
maintenance service. You will see
‘‘OIL LIFE 100%’’ on the information
display the next time you turn the
ignition sw ...