 Honda Accord: Mainshaft Disassembly
NOTE: Refer to the Exploded View in the Mainshaft Reassembly, as needed, when removing components pressed onto the mainshaft (see page 13-38).
1. Remove the angular ball bearing (A) and the tapered cone ring using a commercially available bearing separator (B) and a commercially available bearing puller (C). Make sure the bearing separator is under the tapered cone ring.

2. Support 5th gear (A) on steel blocks, and press the mainshaft out of the 5th synchro hub (B) and 5th gear.
NOTE: Do not use a jaw-type puller; it can damage the gear teeth.
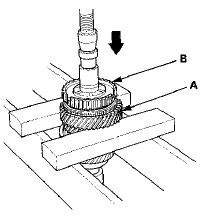
3. Support 3rd gear (A) on steel blocks, and press the mainshaft out of the 3rd/4th synchro hub (B) and 3rd gear.
NOTE: Do not use a jaw-type puller; it can damage the gear teeth.

 Mainshaft Assembly Clearance Inspection
1. Support the bearing Inner race with an appropriate
sized socket ( A ) , and push down on the mainshaft ( B ) .
2. Measure the clearance between 2nd gear (C) and 3rd
gear (D) with a feeler gaug ...
 Mainshaft Inspection
1. Inspect the gear and bearing contact areas for wear
and damage, then measure the mainshaft at points A,
B, C, D, and E. If any part of the mainshaft is less than
the service limit, replace it.
...
See also:
Playing a CD
Your audio system supports audio CDs, CD-Rs and CD-RWs in either MP3, WMA, or
AAC*1 format. With the CD loaded, select the CD mode.
• How to Select a File from the Music Search List
(MP3/WMA/ ...
Steering Wheel Adjustments
Make any steering wheel
adjustments before you start driving.
Adjusting the steering wheel
position while driving may
cause you to lose control of the
vehicle and be seriously injured
in ...
Rear Seat Side Bolster Cover
Replacement
4-door
NOTE: Take care not to tear or damage the seat covers.
1. Remove the seat side bolster (see page 20-242).
2. Release all the hook strips (A), fold back the seat side
bolster cover (B), ...