 Honda Accord: Lower Arm A Replacement
1. Raise and support the vehicle (see page 1-13).
2. Remove the rear wheel.
3. Remove the parking brake cable mounting bolt (B).
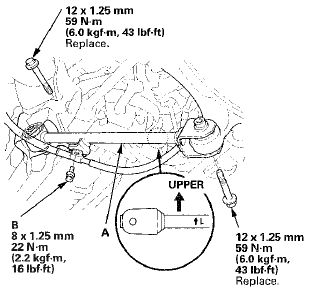
4. Remove the lower arm A mounting bolts, then remove lower arm A.
NOTE: Use new mounting bolts during reassembly.
5. Install lower arm A in the reverse order of removal, and note these items: - First install all of the components, and lightly tighten the bolts, then raise the suspension to load it with the vehicle's weight before fully tightening to the specified torque.
- Before installing the wheel, clean the mating surfaces on the brake disc and the inside of the wheel.
6. Check the wheel alignment, and adjust it if necessary (see page 18-5).
 Upper Arm Replacement
Special Tools Required
- Ball Joint Thread Protector, 14 mm 07AAE-SJAA100
* Ball Joint Remover, 32 mm 07MAC-SL0A102
1. Raise and support the vehicle (see page 1-13).
2. Remove the rear wheel.
...
 Control Arm Replacement
1. Raise and support the vehicle {see page 1-13).
2. Remove the rear wheel.
3. Remove the control arm mounting self-locking nut (A)
and the washer (B) from the knuckle side.
NOTE; Use a new ...
See also:
Fuel Pressure Relieving
Before disconnecting fuel lines or hoses, relieve
pressure from the system by disabling the fuel pump,
running the engine until it stalls, then and disconnecting
the fuel line/quick connect fitting ...
Mainshaft Disassembly, Inspection,
and Reassembly
1. Inspect the thrust needle bearings and the needle bearings for galling and
rough movement
2. Inspect the splines for excessive wear and damage.
3. Check the shaft bearing surface for scorin ...
Steering Wheel Installation
SRS components are located in this area. Review the
SRS component locations: 4-door {see page 24-21),
2-door (see page 24-23) and the precautions and
procedures (see page 24-25) before doing repair ...